Thursday, September 30, 2010

Holy Shit! More on a Stick!

 
Turkey is another yummy thing to cook on skewers.  By marinating strips of meat in a spicy marinade, you can turn mild-tasting turkey into a delicious flavor-packed meal that's healthy, convenient, and impressive.  These are delicious right off the grill, or even chilled the next day.  


TURKEY CHOOCHACHEECHACHOO FOR A CROWD OF SCREAMING FANS!

INGREDIENTS:
1 entire turkey breast
1 package of McCormick "Zesty Herb" marinade mix
2 teaspoons of curry powder
1 teaspoon of turmeric
1/2 cup white vinegar
1 teaspoon of dried garlic OR 4 cloves of fresh chopped garlic
Hot sauce to taste (I insist you use Frank's; a goodly amount, but not so much that people think they are eating buffalo choochacheechachoo [though now that I think about it, that sounds pretty good too]!)


EQUIPMENT:
skewers
knife
1 gallon plastic bag

First, take the skin off of your turkey breast.  Then cut all of the delicious boob meat off of your turkey, trying to keep each half as intact as you can.   (You can save the bones and all the meat sticking onto those hard-to-reach places for soup stock; just toss it in the crockpot with a bit of veggies and your choice of spices, add some water, and... Bob's your uncle!  Yummy stock/broth in about 3-4 hours!)

Slice the turkey breast meat into strips and place into the plastic bag.  Add all the other ingredients and marinate 8 hours or overnight.  When it's time to cook the turkey, place the strips onto sticks and grill for about 20 minutes on a low heat, or until the turkey is done.  Sometimes I finish these off with a light glaze of apricot preserves and curry powder so they'll look pretty on a plate, but if that's not your thing, this is especially tasty with Awesome Sauce.


Thursday, September 16, 2010

Shit on a Stick Redux

In keeping with the spirit of my "Summer of Food on Sticks," I have decided to write a bonus article about some of the other things I've been putting on sticks lately.  It's not all about beef heart choochacheechachoo in this house. ;)

One of the healthiest, easiest, and tastiest "stuff on sticks" that I enjoy is frozen grape choochacheechachoo.  These are super easy, and so convenient when you need a snack. 

FROZEN GRAPE CHOOCHACHEECHACHOO

INGREDIENTS:
grapes (best if you have 2 or more colors)

EQUIPMENT:
skewers

All you need to do is wash your grapes well, and then place 9 grapes on each skewer.  If you have many different types of grapes, you can do some fun patterns, too!  Pop them into the freezer and keep them there overnight.  These look beautiful arranged in bunches on a platter or tray, but are also a wonderfully convenient fruit snack when you're craving something quick, sweet, and satisfying.  Kids love them too.

Friday, September 10, 2010

Challah Back

Although carbs are awesome, I've never been big on just plain commercial grocery-store bread.  However, fresh yummy bread that's made from scratch is a wondrous thing.  I lack the patience to make it very often; once every few years is enough.  I hate having to wait all day for the darn thing to rise, then I worry about the cooking time in the oven... and then, of course is the thrill of cleaning up all the floury mess.  Yeah... just not my thing.

I have long suspected that I might just become awesome at baking bread if I'd just try it a little more often.  Rosh Hashanah seemed like the perfect time to make my all-time favorite type of bread: challah!  (Bagels [if they count] are a very close second, and croissants are third on the list.)  Challah is quite the endeavor, but the results are soooooo worth it!

Usually my way of cooking a new recipe is to scan it for things I want to change before actually attempting it.  This time, however, I Googled for a recipe that seemed to make the most sense to me, and -- miraculousy -- decided to follow it to the letter.  My pick was Maggie Glezer's honey-scented challah recipe, which looked and sounded absolutely decadent with its added smattering of honey to the dough.  The entire process, while arduous to me, was still such fun and yielded two little loaves of the most perfect challah one could ever desire.  And although it wasn't what I'd call easy, the recipe was straightforward enough that even a bread n00b like me wasn't able to screw it up!

Apparently, Maggie is somewhat notorious for her bread recipes 'round the internet, as I've seen several  other bakers reproducing the offerings from her book A Blessing of Bread: Recipes and Rituals, Memories and Mitzvahs as well.  Eli at The Fresh Loaf took some fantastic pictures of the fruits of his labor, and Sarah Kagan at Epicurious got some great tips from Maggie on how to ensure the best possible results.

I don't have permission to reprint the recipe here, but she has it over at Epicurious for those who are interested in trying it (and I highly recommend that you give it a whirl!).  I can, however, show you some of the pretty pictures that I took while Fuzzband and I worked on our challah.


We made our yeast slurry, then added the rest of our wet ingredients....


...mixed in the other dry ingredients...


...and turned it into a ball!


We covered the ball with some plastic grocery bags (a great way to reuse), and let it sit on the table for a couple of hours.  It doubled in size and started to smell awesome!


Then it was time to assemble my loaves.  I divided the dough ball into halves, and made 3 long skinny strands out of each half.  I braided them together...


... and set them up on my trusty old cookie sheet.  Then we covered them with our plastic bags, and left them on the table to proof.


And proof they did!  When we'd unwrapped them, they surprised us by being almost 3 times bigger than they were before!  Look how succulent and fat and yummy they are!  Fuzz brushed the outside with egg while I snapped an "action shot," then into the oven our challahs went!


Here's the stunning finished product, all shiny and gorgeous.  It smelled and tasted so amazing that we've decided to definitely make it again -- maybe next year, but perhaps even sooner.


Sunday, September 5, 2010

Glove Love

I needed some gloves to protect the backs of my hands from the sun during a long car trip, so I came up with these super-duper easy gloves!  They're so easy that even the most elementary knitter (like me!) can make them.

The yarn I chose was Bernat Soft BouclĂ© acryllic/poly blend and number 10 needles.  It had a cool fuzzy texture that was a bit slow to work with at times, but overall it worked out fine.  I knitted a rectangle that fit my hand (it was 35 rows in length), then then sewed it up one side, leaving a small hole for my thumb near the top.  Then I braided some extra yarn into small strips, and sewed the strips between my fingers to make secure little sections for each finger.

It worked great, and I didn't get any sunburn on the way home!  Best of all, the yarn cost about $6 and I still have probably 80% of it, so this was also a very cost-effective project as well!  Next time I'll see if I can learn how to make fingers.

Tuesday, August 24, 2010

I Heart Shit On a Stick

According to serveral articles I've been reading (here, here, and here), America's least favorite food is liver. I'll bet you didn't need a poll to know that, though.


I can still remember the first time I tried liver.  I was two or three, it was a fairly cloudy day, and I wore a dark blue long-sleeve shirt and possibly an eye patch.  My brother and I were eating our dinner in the living room, sitting on the floor in front of the TV, with our plates on the coffee table.  My mother gave us our dinner plates which contained liver sauteed with some onions, and green beans on the side.  When my brother tried it, he said, "Ew, the liver's yucky!  I'm not gonna eat it!" He ate all his beans, and drank all his milk out of his little blue Tupperware cup that everyone had in the 1970s (the red one was mine), but he left every bit of that liver on his plate -- including the piece he'd tried and spit back onto the plate.  I had a few green beans, contemplating my brother's statement of what had been set before us.  The only food that I didn't like was bananas, and since a piece of meat couldn't possibly taste like one, I wondered what the hell was so bad about it?  I'm glad I didn't cave to peer pressure -- it was delicious.  I can still remember the texture of the beautifully caramelized outer layer, which my mother had achieved by dredging it with flour before sauteeing it to a perfect degree of doneness... the soft-but-spongey texture as I chewed it... that pure, clean (?!) organ-y taste mingling with the onions and just a hint of butter.   I also remember that my poor brother was told to eat a few more bites of liver before he was given his dessert -- vanilla pudding, fresh off the stovetop.  I consumed the contents of my plate with relish, both mystified and full of pity for my brother, who just didn't seem to get how great the liver was.  Two decades later, liver remains one of my favorite foods.  (My own recipe isn't bad, but it's not even close to as good as my mom's.)


I can see why people don't like liver, though.  It has a strong taste.  Its purpose is to detoxify the body by breaking town toxins, hormones, and insulin; it is the storage center for many different types of vitamins and minerals, such as vitamin D, iron, and copper -- it's a very busy organ, so naturally it's going to be strong-tasting and sometimes a bit tough in texture.  I have microcytic anemia, and have struggled to maintain my iron levels for just about as long as I can remember; liver showed up at my house for dinner pretty frequently when I was younger.  More often, during times of the month when my energy was especially depleted (like a visit from Aunt Flo), my mom would get some thick bloody steaks; we'd fire them up and consume them with plenty of salt, pepper, and gusto.  Most of the time, these really did make me feel better.


It is for these reasons that I didn't even hesitate to try my first helping of beef heart many years ago -- I'm an adventurous eater, always itching to try something new. True, the idea of eating a heart can seem pretty gross to some people, but an open mind helps a lot. I'd eaten chicken and turkey hearts before, but always after they'd been boiled to death as a flavoring agent for stock or gravy. I had expected the red, bloody heart to taste a lot like liver, but in fact, it's nothing like liver! The heart does function as a major organ, but it's actually a muscle. Beef heart tastes a lot like really good steak, fibrous but surprisingly juicy, with a wonderfully satisfying texture that is substantial but not too tough. Preparing the heart can take some work -- there is often a layer of hard fat on top, and lots of leathery "silver skin" on the outside of the heart, as well as some connective tissue on the chambers underneath -- but once you get through with trimming those away, you are left with a delicious piece of meat with outstanding flavor and texture.


For years, on the rare occasions that Fuzzband would see hearts at the store, he'd snap them right up. Recently, he had the brilliant idea to just ask the meat guy at our local market. (I think it was at Stop & Shop, but it could have been Market Basket, for those of you in New England!) You don't need to go to a fancy food shop to find them. Just go to your meat department and ask the guy or gal in charge; they'll be happy to hook you up. Beef heart can occasionally be found among the usual offerings of steaks and roasts, but not all stores will order them unless they're getting them for a specific reason. The meat guy told Fuzzband that we didn't need to order the entire case, but any of the hearts that we didn't take would be offered in the store to other customers. Because of the low demand for beef heart, Fuzzband agreed to take the entire order. So we had about 12 pounds (8 tasty hearts) for me to enjoy.


The hearts were packaged by "Rumba Foods," and vacuum-sealed so there was plenty of time to enjoy them once they had arrived. My husband was curious about other organ meats that Rumba offered (since he also keeps a lookout for things like kidneys and oxtails), and was excited to find a recipe section featuring a yummy-looking idea for cooking the hearts when simple skillet cooking proved to be boring for me.

He couldn't remember the name of the dish, but he described it to me: It was pieces of heart, trimmed, chopped into pieces, and marinated in a spicy brine; then the meat is placed of skewers and grilled. The name, he said, was an unusual Spanish word. "It sounded like... some word I'd never heard... like... choochacheechachoo... or something like that."

The real name for this dish is Anticuchos, which is a Peruvian treat made of any type of meat (but most often beef heart) which has been marinated and skewered. You can find the original recipe for Anticuchos at the Rumba website, along with all kinds of other interesting ideas. (It sure would save money if I ordered some tripe and learned to make Mondongo at home! YUM!)  There's another recipe for it on Wikibooks, but it seems a little more hot-centric than spicy flavor-centric.

Because my own recipe is an Anticuchos variant, and while more or less true to the original, I call my version Choochacheechachoo after Fuzzband's made-up memory lapse word.  It's a whole lot of fun to say, too, especially if you whisper it really fast.  Choochacheechachoo!  Try it! :)

CHOOCHACHEECHACHOO

INGREDIENTS:
1-2 beef hearts (use 2 if they're small; you need about 2.5-3 pounds)
A handful of minced cilantro (about 1/4 cup -- see my notes at the end)
2T ketchup
3T cumin
2T dried garlic pieces (or 4-5 cloves of minced fresh garlic)
1 tsp black pepper
1/4-1/2 tsp hot sauce (I like Frank's; this is optional, and you can use more if you want more heat)
white vinegar (anywhere between 1/2 and 1 cup, depending on how much heart you have.)

EQUIPMENT:
sharp knife
cutting board or plates
one-gallon freezer bag
a grill
about a dozen or so skewers


After you've removed the hard fatty lumps, the connective guts, and the "silver skin" from the outside of the heart, you'll have a big yummy piece of meat to work with.  All of the fat is on the outside of the heart, and once it's gone, what remains is lean and delicious!  Slice the meat into strips; I can usually get between six and eight strips out of one heart.  I used two hearts for this batch, but once I had a 3-pounder that made over a dozen strips! 


Put the strips in your plastic bag.  Add the remaining ingredients.  Close the bag, making sure to get out as much air as possible, and massage the seasonings into the meat.  Put in the fridge and marinate a minimum of 12 hours.  (I have marinated my choochacheechachoo for as long as 2 days, but overnight is best IMHO.)  The vinegar will tenderize the meat; the garlic and cilantro will blend together and create a fantastic flavor.)

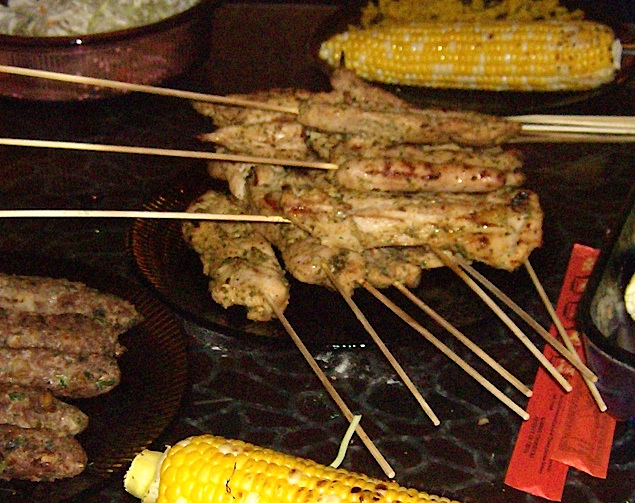
When you're ready to grill, put the meat strips on skewers.  Cook them on a hot grill for about 5 minutes (a couple of minutes per side) until they're cooked to your doneness preference.  Set aside for 10 minutes or so after grilling to let the meat rest.  Each piece of choochacheechachoo should contain around 2 ounces of meat, so this recipe should serve about 5 or 6 people if everyone has 2 or 3 pieces.  It's also a fun and satisfying party appetizer for a crowd, too!  Leftovers will last several days in the fridge, and are awesome hot or cold.  I don't even bother reheating them the next day; choochacheechachoo isn't greasy since all the fat has been trimmed!

My camera ran out of batteries before I got a good picture of the final product, but my next batch (below) didn't have nearly as much cilantro as the one that was prepared above.  It was still tasty, though I think cilantro and tons of garlic are necessary for the best flavor!


NOTES:  I like having the meat cut into strips rather than chunks; it's juicier that way, plus it feels so deliciously primal to yank the meat from the stick with my teeth!  If some of your strips are a little short, it's definitely OK to combine them for a more uniform portion size.  And if you hate cilantro, use fresh parsley in its place.  It's not exactly the same, but something green in the marinade will make for a tastier choochacheechachoo.


Saturday, August 14, 2010

Succotash Without the Suffering

For a long time, I was unable to eat corn in its natural state.  Sure, I'd enjoy the occasional cornbread product, or taco, and you just know there's nothing better than that first swig out of an ever-so-slightly chilled can of Coke after rolling out of bed at the crack of noon.  But corn -- just plain old corn?  Would I, could I, on the cob?  Oh, hells no!

I live in the real world, and am never afraid to cook with limitations.  Before Fuzzband and I were married, we lived in sin together all over the country. During our time in Phoenix, we were so broke that we literally had a single-digit dollar amount as our grocery budget quite a lot of the time.  Fortunately, I was a really creative shopper and an even more creative cook.  With the combination of my ingenuity, the energy of my youth, and the inspirado of a girl passionately in love, each day was a challenge which I met happily.  We lived off of Kool-Aid, ramen, cans of pork-n-beans, and the oft-present shitty ground beef offered in "tube" form.  If key lime pie Yoplait went on sale for a quarter a pop, we'd occasionally treat ourselves.  When payday came around, we'd feast at the $4 Chinese grease buffet, always sure to stuff my backpack full of gallon-size freezer bags with which to smuggle a few egg rolls and chicken wings as parts for my Frankensteinian culinary creations.

And there was corn.  Oh, sweet Jesus on toast, was there ever corn!  We'd get a dozen cobs of the stuff for anywhere between 50 and 80 cents at Albertson's or Smitty's.  It was cheap, it was plentiful, and it was available any time of year.  I put corn into as many dishes as I could think of.  We ate so much corn that it turned up at "bathroom breaks" even on the days when it wasn't prominently featured on the menu.  After we left Phoenix, I had gained several thousand culinary experience points, though I never again bought corn on the cob.

...Until this year.  It was truly memorable... thirteen years after living in Phoenix, my husband spotted the corn on the counter and gasped, "OH MY GOD, IS THIS CORN AND WHERE THE HELL DID IT COME FROM?"  I've been giving cooking lessons to a friend, so I assume that he'd guessed that someone had brought it over.  But no, it was me... commissioning the delivery of the corn, determined to give it a whirl once again.  True, it wasn't as sweet a deal as I'd gotten in the gay '90s, now at a cool dollar for 6 cobs, but still it somehow made the cut on my PeaPod list, like a particularly bloody car accident or some awful porn featuring unnatural and hilarious contents.  You know you shouldn't look, but it's way too hideous not to rubberneck a little.  And so goes my current adventure.

A couple of years ago I'd found a succotash recipe that I just loved -- it was designed for diabetics, and this variant featured edamame instead of starchy lima beans, and sweet fibrous yellow zucchini chopped into little bits to substitute for the corn.  Occasionally I pull this recipe out when I'm looking for a nice veggie side, but this week I was craving something that was a cross between the healthy fiber-rich version, and the typical comforting dish we all know and love.  Here's what I came up with:

PRETTY GOOD SUCCOTASH

INGREDIENTS:
1-2 yellow zucchini (use a couple if they're really small)
1 green zucchini
2 cobs of corn, removed from the cob
4 ounce can of lima beans
1 medium onion
2 tablespoons Olive oil
McCormick Montreal seasoning mix to taste (I use a couple of pinches)

Chop the onion and cook it in the olive oil until it's golden and translucent (about 10 minutes).  While the onion cooks, chop your zucchini into small pieces, about the size of grains of corn.   Add the zucchini to the pan, stir well, and cover the pan while the zucchini steams (should take about 5 minutes or so).  When the zucchini starts to become tender, add the Montreal seasoning, lima beans, and corn.  Stir and keep on the heat for another minute or two, until everything has been heated through.  (Corn can be eaten raw, but it is nice to get it warmed up a little!)  Remove from heat and serve.


Friday, July 30, 2010

Make Your Own Laundry Detergent

Trent over at The Simple Dollar wrote a really interesting article on how to make your own laundry detergent.  His formula was remarkably similar to my own "washing slime" that I used to use on my delicate hand-washables which I'd clean in the bathroom sink.  Like mine, his formula starts out with a bar of soap processed with water.  Mine added scented linen water to the mix, whereas his includes washing soda and Borax.  My mother used to keep a MASSIVE box of Borax in our basement laundry room.  I never had any idea what it was for, but I do now!  I guess people used to use it back in the day for removing stains, or adding it into laundry that was particularly dirty.  It can be harsh on clothes, but effective.  It also makes a great base for all sorts of natural cleaning agents.

Fuzzband used to find my washing slime to be rather gross, but when I explained the cost saving in Trent's formula, he was intrigued to find out if the DIY laundry soap could really clean as Trent claims, comparable to liquid Tide!  We decided that it'd be an interesting weekend project and set about gathering supplies.


Homemade Laundry Detergent Ingredients:
1 bar of your favorite soap
1 cup washing soda
1/2 cup borax
3 gallons of water (plus a little extra)

Equipment:  Big ol' pot (or smaller pot and bucket, big enough to hold about 3 gallons), knife or grater for demolishing soap, spoon for stirring, containers for storing the final product.


The first thing we did was to get our shit together.  We bought the Borax and the washing soda (there's plenty left over to do other projects).  I'd had a cake of unscented Dove in my kitchen ever since my mother-in-law included it with the late, great Aunt Pearl's hand-crocheted afghan to pretty up the musty in-storage smell.  The soap still smelled good, and I knew it'd be perfect for this project.  (The Sidekick is an optional ingredient!)


My husband started a couple cups of water boiling in our big ol' pot while I chopped up the bar of soap.  Originally, I wanted to shave it with a vegetable peeler, but after about 10 seconds of futile scraping, I gave up and hacked the darn thing to bits and pieces.


Into the pot our soap shavings went!  We boiled the whole thing, until it turned into...


... a big, foamy blob o' fun!  Then it was time to add the Borax and the washing soda.


Then Fuzzband poured in about three gallons of water.   We almost used Hawaiian Punch, but we got thirsty.  So yeah, in went the water.  Then we stirred the mix until it was thoroughly blended, covered it (to keep out the dust), and left it to "cure" until the following day.  (Trent's directions say to leave it for about 24 hours -- I think we left it for somewhere around 16 and it was just fine.)


You can tell it was a day later, 'cause our kitchen got a bit cleaner. ;)  The final product, Trent's website says, may be slimy or watery or thick or something completely different.  Ours was nearly perfect liquid detergent consistency -- it was only a slimy, but no big deal.  I broke it up with a wooden spoon before we poured it into our leftover detergent bottles.  (OK, actually I rolled up my sleeves and played in it for awhile first.  My hands were very dry afterward, so I wouldn't recommend using this formula on skin.  Keep it in the washing machine, people!)


The batch yielded enough detergent to fill up this many bottles!  We'll probably use a capful or two per load, so we don't need to worry about getting/making new detergent for months and months!


You might ask how the homemade detergent cleans.  To tell you the truth, I don't notice much difference between our DIY stuff and the usual laundry detergents that we use -- BUT, just to let you know, most of my clothes are black.  So I didn't try any white shirt/mustard tests. ;)    It smells vaguely like the unscented Dove bar that we used, so it gave our clothes a very subtly, yet comforting fragrance of my in-laws' house.  In the interest of keepin' it real, I tried my best to stick with Trent's recipe.  I don't think I'd change anything about the ingredients or instructions -- maybe next time I'll add a bit of essential oil if I try a different soap.  

This was a super fun project!  If you're on the fence about trying it, I'd say that you should go for it.  The basic ingredients will cost you less than $10, and you'll have them for a lot longer than that store-bought bottle of detergent.  Give it a shot!

Friday, February 19, 2010

Review: Splat Haircolor

The review below is one that I did a few years ago...


After MANY long months of reflection and self-debate, I FINALLY got a haircut. In fact, my hair is now shorter than it's been since I was 3 years old (27 years ago, you do the math). My color plan was to stop messing with Manic Panic-ed streaks, and go for one wild shock of unnatural color throughout my entire head -- with just a smidge of blue-black locks on the top.

I know a lot of you are interested in either having or maintaining a goth or punk flair to your hair, so thought I'd share my experience with you. My usual Manic Panic gel color, "Fuschia Shock," has been discontinued in gel formula. I still have 2 bottles left, but it's no secret that I've been exploring other options! I stopped at the drugstore after getting a fantastic bob haircut, in search of some dye and a lightener. (I usually use Clairol Frost & Glow, which is usually reasonably priced at $9-$12, works easily and well.) As I perused the aisles, I noticed a product called Splat Haircolor in "Luscious Raspberries" which consisted of a lightening kit and a bottle of semipermanent color. The whole kit cost $9.99, so I decided to give it a whirl.

My experience with Splat was mixed. The squeeze bottle of lightener was a pain in the ass, because the liquid/powder mixture didn't seem to mix together very well initially. I had to cut off the tip of the bottle when it got jammed with solution, and the solution was VERY thick. My new hair was short, but there didn't seem to be nearly enough lightening solution for my whole head as planned (either that, or the solution was just too dense to spread evenly); I wound up with some very uneven streaks throughout my head. Granted, this could be chalked up to "operator error," as I still hadn't gotten used to managing my new length yet. The "Luscious Raspberries" color was not unappealing, a pretty pinkish-red. (I wound up mixing the very last of my current bottle of Manic Panic into it, though.) The dye didn't seem to take too long to absorb, but it was EXTREMELY drippy and messy, unlike Manic Panic which pretty much stays where you put it. I had "Luscious Raspberries" colored streaks running down my face, my neck, and all over the tips of my ears. YUCK!

The color cleaned up reasonably well, only requiring a bit of bleach and minimal scrubbing. Unfortunately, my experience is that the easier clean-up is, the less time the dye tends to stay in the hair. It's been 4 days now, and I'm still getting pink dye on the bristles of my hairbrush, and pink puddles when I step out of the shower.

Pros: Cheap; nice vivid color; easy clean-up; kit comes with everything you need.
Cons: Extremely messy; easy directions to follow, but harder to actually handle; dye seems to fade quickly.
Overall rating: C+ (I've seen better, I've seen worse; this stuff's not too bad if it's your only option.)

Tuesday, October 20, 2009

Recipe For a Snowy Day


Winter will officially begin this week, and today was the first major snow that we’ve had here in New England. As usual, my husband will be getting home pretty late . He does an hour-long commute both to and from work each day, so rather than sit in snowy traffic for 4 hours on a snowy Friday night, he’s going to stay in the office for a couple of extra hours until the traffic dies down.

This past week, we had a power outage that left us in the dark for 4 days. Needless to say, all the crap in my fridge and freezer were lost — and that includes my precious condiment collection! We had our weekly groceries delivered last night, though: mostly a lot of fresh meat and veggies. Eating out of cans for 4 days in a row can be pretty draining to the soul!

Since the weather outside is pretty brutal today, I’ve decided that I really want to make something warm and comforting for dinner tonight. And nothing accomplishes that feeling better than a big bowl of homemade soup — except, of course, if it’s the sort of soup that can be made by throwing a pile of stuff into the crockpot and forgetting about it.

CROCKPOT VEGGIE-BEEF SOUP

1 lb. London broil

1 15-ounce can of your favorite type of beans, drained (and hopefully rinsed)

2 cups vegetable juice cocktail (V8)

1/2 cup pineapple juice*

1/3 cup low-sodium soy sauce

2-4 cups of water (some of the veggies will provide moisture too)

1/2-1 cup chopped carrot

1/2-1 cup chopped celery

1 large chopped onion

good-sized pinch of dried rosemary (maybe 1/2 tsp or so; crumble it up between your fingers as you add it, unless you like big blobs of it everywhere.)

small pinch of dried basil (1/4 tsp or so)

2 bay leaves

Salt and pepper to taste


DIRECTIONS:

Chop up all the veggies and place them in the crockpot; you can choose to cut the meat now, or pull it apart once it’s cooked. Add the other ingredients into the crock pot and cook on High for 4 hours, or Low for 8 hours. (Add the beans at the beginning if you want them soft and falling apart, or at the end if you like yours to be more firm.) I’d recommend using salt once this soup has been served; soy sauce and V8 have quite a bit of sodium, and you may find you don’t really need it.

To make this a vegetarian meal, simply omit the London broil and add another 1-2 cans of beans (mix and match whatever you like).

I’ve added all kinds of other vegetables to this soup, but the ingredients above are the basic building blocks. Peppers, zucchini, mushrooms, and fennel are all delicious in this recipe.
Related Posts Plugin for WordPress, Blogger...