Tuesday, October 20, 2009

Recipe For a Snowy Day


Winter will officially begin this week, and today was the first major snow that we’ve had here in New England. As usual, my husband will be getting home pretty late . He does an hour-long commute both to and from work each day, so rather than sit in snowy traffic for 4 hours on a snowy Friday night, he’s going to stay in the office for a couple of extra hours until the traffic dies down.

This past week, we had a power outage that left us in the dark for 4 days. Needless to say, all the crap in my fridge and freezer were lost — and that includes my precious condiment collection! We had our weekly groceries delivered last night, though: mostly a lot of fresh meat and veggies. Eating out of cans for 4 days in a row can be pretty draining to the soul!

Since the weather outside is pretty brutal today, I’ve decided that I really want to make something warm and comforting for dinner tonight. And nothing accomplishes that feeling better than a big bowl of homemade soup — except, of course, if it’s the sort of soup that can be made by throwing a pile of stuff into the crockpot and forgetting about it.

CROCKPOT VEGGIE-BEEF SOUP

1 lb. London broil

1 15-ounce can of your favorite type of beans, drained (and hopefully rinsed)

2 cups vegetable juice cocktail (V8)

1/2 cup pineapple juice*

1/3 cup low-sodium soy sauce

2-4 cups of water (some of the veggies will provide moisture too)

1/2-1 cup chopped carrot

1/2-1 cup chopped celery

1 large chopped onion

good-sized pinch of dried rosemary (maybe 1/2 tsp or so; crumble it up between your fingers as you add it, unless you like big blobs of it everywhere.)

small pinch of dried basil (1/4 tsp or so)

2 bay leaves

Salt and pepper to taste


DIRECTIONS:

Chop up all the veggies and place them in the crockpot; you can choose to cut the meat now, or pull it apart once it’s cooked. Add the other ingredients into the crock pot and cook on High for 4 hours, or Low for 8 hours. (Add the beans at the beginning if you want them soft and falling apart, or at the end if you like yours to be more firm.) I’d recommend using salt once this soup has been served; soy sauce and V8 have quite a bit of sodium, and you may find you don’t really need it.

To make this a vegetarian meal, simply omit the London broil and add another 1-2 cans of beans (mix and match whatever you like).

I’ve added all kinds of other vegetables to this soup, but the ingredients above are the basic building blocks. Peppers, zucchini, mushrooms, and fennel are all delicious in this recipe.

Monday, October 19, 2009

Halloween Shopping Tips

If you're anything like me, you get a special thrill out of going to the store to shop for Halloween stuff!!! (This is because you'll probably use it all year, and not just until Halloween's over.) Here are a few tips on what to look for, and what to avoid, this Halloween when you're out scavenging for goodies:

* CLOTHES: Anything non-seasonal that you can use all year 'round. Look for skeletons, spiders, bats, skulls. If you like pumpkins and will wear pumkin-themed clothing all year, go for it. Buy stuff in any colors you like... I like black & purple, which are easy to find at Halloween!

* MAKEUP: Hit the makeup section and see if you can find anything interesting. Always seek black lipstick and nail polish. Also worth having: Lip or nail colors in dark, dramatic, or unusual colors; jewels or other cool accents for the face; "normal" cosmetics in cute gothy containers; special-effects cosmetics or theatrer-type makeup items that are hard-to-find normally (such as eyebrow plastic or spirit gum).

* ACCESSORIES: Halloween is the best time of year to find accessories with bats, skulls, or other spooky themes. You can find just about anything you need, with a spooky style... hair accessories, purses, hosiery (gotta love striped stockings!), shoes, wigs, jewelry, and more!

* HOME DECOR: Be very careful of items offered in this category, lest you get overly cheesy items in your enthusiasm! You can find some good stuff, though... like skull/death themed pieces, even spooky or cool-looking kitchen ware. DEFINITELY look for candles, as you can get fantastic styles and colors during the season! Be careful of plastic, cheaply or badly-made items. Remember that many of these are meant to be used only for a short time and then tossed away. It may take awhile to find quality items that will last in your home for years, but the efforts are so worth it!

* EDIBLES: I like Halloween candy and treats all year 'round. Some of my favorite treats are things like General Mills Monster Cereals, Pillsbury Halloween cookies (just cut and bake), and of course, Halloween Pop Tarts. Many companies are beginning to release special Halloween edition things with either special packaging, or unusually-decorated versions of their regular products, so this is the perfect time of year to stock up!

* CRAFT ITEMS: Absolutely nowhere is more fun than a craft store at Halloween... but take my advice and DON'T wait 'til the last minute! You can find all kinds of wonderful things here, to fulfill your crafting fetishes well into next year!! Look for fabric, notions, beads, ribbons, even cool accessories and must-have crafting essentials in creepy Halloween styles! Some craft stores do pre-season Halloween sales in September or even August, as crafty folks will often make their own costumes and come looking for their ingredients in advance. The early bird will catch the cutest stuff!! Latecomers may be surprised by a fantastic rare find or two, but I'd try to hit the craft shops as early in the season as possible.


More tips...

1. Timing is key. It's always best to start browsing as soon as the Halloween stuff goes up, usually around the middle of September. If you see something that you absolutely MUST have, snap it up at your earliest convenience -- it may not be there next year, or even next week! You can also try to wait until November 1st to make the most of clearance sales (one of my personal missions in life!), but remember that Halloween stores typically close before then. My favorite place to try on November 1st would be drugstores, as they're practically giving the stuff away. (The best stuff may be picked over -- or gone entirely -- if you wait too long!)

2. Location. If you see something that you absolutely MUST have multiples of, in a chain store, try visiting the same stores in different cities. For example, this year I found an awesome coffin container in the Target near my New England home; a few weeks later I visited my in-laws in NYC and came across the same one! (I should have bought it the second time around, but fortunatley coffin number one is in my office now!)

3. If you're picking through clearance stuff, don't be afraid to haggle. Lots of Halloween stuff is going to be seriously marked down come the first of November. Some pieces will just be thrown into the clearance bin without even being tagged! One year I found a thick faux dungeon chain (it was made of styrofoam and painted to look metallic and old/rusty) just sitting around with a bunch of cheap Halloween makeup, and even though it wasn't tagged, the checker "decided" to sell it to me for 99 cents. A true Halloween find!

4. Plan ahead. Make lists of what you need, who's having sales, or of where you got the best hauls in Halloweens past. Try your favorite "haunts" but don't be afraid to plunge into uncharted territory. You never know what you'll find! (My favorite discount store to Halloween shop is definitely Target, as their stuff is high enough in quality to last for many years... as for drugstores, it's gotta be either CVS or Rite-Aid for their wide selections of makeup and costume-y pieces. I tend to avoid Wal-Mart, which sells cheesy "rustic" fall crap, and Halloween-themed shops, which are mostly filled with overpriced junk. I did get a nice ceramic skull-shaped serving tray at the Halloween store last year, though, so as I said... be flexible, and don't be scared to travel off your beaten path!)

I've gotten some good stuff this year so far, but will be making my last Halloween run on November first. Happy hunting, all!

Wednesday, August 12, 2009

Save Our Planet Earth


Yahoo! is going to be deleting Geocities this year... taking away some informative websites that have been around since the beginning of the internet as we know it. The Internet Archives at http://www.archive.org will be trying to get as many sites as possible until that fateful day, but many will be gone forever!

 The original URL is http://www.geocities.com/EnchantedForest/8319/savethearth.html. Our planet is in peril, so if you haven't started doing the baby steps below, you'd better get cracking! :)

We've got to Save Our Planet Earth!


Oh, No! Our earth is in trouble, and we've got to save it!Oh, No!: Bad Facts about our earth

  • If you throw away 2 aluminum cans, you waste more energy than1,000,000,000 (one billion) of the world's poorest people use a day.
  • Making a new can from scratch uses the uses the energy equal to half a can of gasoline.
  • About one third of what an average American throws out is packaging.
  • More than 1,000,000,000 (one billion) trees are used to make disposable diapers every year.
  • In one minute, 50 acres of rainforest are destroyed.
  • Some rain has a pH of 3 or 4. (which is pretty acidic, considering 7 is neutral, not acidic, and battery acid has a pH of 1). Some fish, such as lake trout and smallmouth bass, have trouble reproducing at a pH of 6, which is only slightly acidic. Some clams and snails can't survive at all. Most crayfish are dead at a pH of 5. You can see how bad this is for the environment.
  • On average, a person in the US uses energy two times more than a person in Japan or West Germany does, and 50 times more than a person in India.
  • About 90% of the energy used in lighting a standard (incandescent) light bulb is lost as heat.
  • Air conditioning uses 10 times more energy than a fan, therefore, it creates 10 times the pollutants.
  • It takes half the output of the Alaskan pipeline to heat the air that escapes from all the homes in the US during a year.
  • Cars and pick-up trucks are responsible for about 20% of the carbon dioxide released into the air.
  • There are about 500 million automobiles on the planet, burning an average of 2 gallons of fuel a day. Each gallon releases 20 pounds of carbon dioxide into the air.
  • About 80% of our trash goes to landfills, 10% is incinerated, and 10% is recycled.
  • Since there is little oxygen underground, where we bury our garbage, to help bacteria eat the garbage, almost nothing happens to it. Scientists have dug into landfills and found ears of corn still intact after 20 years, and newspapers still readable after 30.
  • The average American makes about 3.5 pounds of trash a day.
  • In a year, the average American uses as much wood in the form of paper as the average resident of the developing world burns as fuel.


26 things we can do to help:

  1. Turn off lights.
  2. Turn off other electric things, like TVs, stereos, and radios when not in use.
  3. Use rechargable batteries.
  4. Do things manually instead of electrically, like open cans by hand.
  5. Use fans instead of air conditioners.
  6. In winter, wear a sweater instead of turning up your thermostat.
  7. Insulate your home so you won't be cold in winter.
  8. Use less hot water.
  9. Whenever possible, use a bus or subway, or ride your bike or walk.
  10. Try to buy organic fruits and vegetables if you're concerned about pesticides. (Organic food is grown without man-made fertilizers and/or pesticides).
  11. Don't waste products made from forest materials.
  12. Use recycled paper and/or recycle it. Reuse old papers.
  13. Don't buy products that may have been made at the expense of the rainforest.
  14. Support products that are harvested from the rainforest but have not cut down trees to get it.
  15. Plant trees, espessially if you have cut one down.
  16. Get other people to help you in your cause. Make and/or join an organization.
  17. Avoid products that are used once, then thrown away.
  18. Buy products with little or no packaging.
  19. Encourage your grocery store sell environmentally friendly cloth bags for people to use when they shop, or bring your own.
  20. REDUCE, REUSE, & RECYCLE.
  21. Compost.
  22. Buy recycled products.
  23. Don't buy pets taken from the wild.
  24. If you have a good zoo nearby, (if the animals are healthy and the zoo takes care of them), support it! Espessially if they help breed endangered animals.
  25. Don't buy products if animals were killed to make it.
  26. Cut up your six-pack rings before throwing them out.


ALSO... If anyone has any URLS to favorite GeoCities pages, please post them below. :)

Saturday, May 30, 2009

This Just In: Sprouting Rules!

I subscribe to a number of email discussion groups which talk about cooking techniques, recipes, and how to incorporate healthier stuff into one's diet. I consider myself to be something of a flexitarian: I'm not a big fan of red meat, and I avoid eggs because sunny-side-up is a royal pain in the ass to get right. However, I do like animal flesh from time to time (mainly poultry and/or anything in sushi form... mmmm, sushi!), and while I'm not majorly into other dairy products, I practically worship the ground that cheese walks on. Even so, many of my meals are vegetarian and/or vegan. I'm always trying to come up with cooking ideas that are interesting, fun, and not too hard on the ol' pocketbook.

A true favorite of mine when I lived in Redmond, WA in the 1990s was a snack called "Munchies and Crunchies." I could get these yummy little gems at the Safeway across the street from my apartment. They were basically a mix of peas, adzuki beans, and lentils with cute little sprouty tails on them. I loved them! True to their name, they were very crunchy and awesome for munching. I often craved the fresh taste and snappy texture, so it was with great sadness that I came to the realization that they were not available at any markets in New England after Fuzz and I moved here in 1999. (The time following was not without beseeching Google about "Where can I buy Munchies and Crunchies in Massachusetts?" / "How do you make munchies and crunchies?")

One of the discussions that I remember on a list years ago, was about "sprouting." There was this small faction of folks who'd fanatically proclaim to us all, "I'm sprouting! Oh yes indeedily-doodily, I love to sprout...Because I'M A SPROUTER!" I never really understood what "sprouting" was, though it seemed complicated and weird to me (I guessed they were alfalfa sprouts which required complicated tools and exotic hard-to-find supplies, as well as a large expanse of backyard in which to garden), plus I found their almost cultish enthusiasm more than a little off-putting. So I deleted those emails and moved on with my life.

Years later (about 3 weeks ago, to be exact), as I searched for ideas about what to feed my elderly pet rabbit in order to fatten him up after a bout of nasty health issues, I came across an online forum about making sprouts at home for pet birds. One of the things they suggested using were lentils. I thought, "What the hell!?" and poured half a cup of lentils (a bag which was supposed to go into a chili that I wound up being too lazy to make) into a big bowl of water to soak.

In the morning, I drained off the water as best as I could, rinsed the beans according to the instructions, and left things to settle. That was the night Fuzz and I went to see The Damned (who, by the way, gave an awesome performance! I especially loved how offended the youngsters were by their dirty jokes. Guess you can't make fun of pedophile priests in front of a Bostonian audience without ruffling a few feathers!)... by the time I'd given the lentils their final rinse, it was 2 a.m. and the little tails were starting to pop out. In just a few hours, these dormant dried lentils had come to life! I could hardly believe my eyes. These were a key component of Munchies and Crunchies, and I'd just made them! By myself!

The next day, the sprouts were even better! I rinsed everything and put them in an old pasta jar. I also did some research about how to keep the sprouts, and made some mesh tops for my jars -- yes, jars. (Fuzz brought me some whole peas a couple of days later so that I could make the most of my new experiment.)

It wasn't long before those lentils and peas had been eaten with gusto, and I was already starting in on my next batches. I'd gotten a bean mix from "seedmart" on eBay, and Fuzz surprised me with a bag of black turtle beans which turned out beautifully. My favorite are still lentils, which are the easiest of all (and great for beginners, hint hint!), and whole green peas. Best of all, I just finished my first bag of dried lentils after 3 weeks -- a bag which originally cost me just 80 cents! The peas were 95 cents, so this is an excellent pastime for anyone who wants to eat super-duper fresh produce and spend very little money. Plus, the best part is that you can make exotic salads and nonchalantly/proudly mention that YOU MADE the sprouts. It feels vaguely godlike -- I can see why those sprouters of years ago felt as if it were a religious experience.

EASY LENTIL SPROUTS FOR BEGINNERS:

Ingredients/Equipment:

1 very clean jar (save a pasta sauce jar and use that to start)
1 rubber band
1 bit of cheesecloth, mesh fabric, fishnet, whatever, etc. big enough to cover jar opening
1/2 cup dried lentils
about 2 cups cool water

Before placing lentils in the jar, rinse them in a strainer or a bowl big enough to allow you to stir them up well. Then, place lentils into your jar and fill the jar up with water. (Your half-cup of lentils will absorb water and become 2 to 4 times bigger!) Put your fabric over the mouth of the jar and secure with rubber band. Leave the lentils alone and let them soak for 8-12 hours.

After enough time has elapsed, dump the water (through the mesh) and add more, shaking the jar gently to rinse all the lentils. Dump the water again, and rinse a couple of times each day to avoid the growth of mold. The lentils will burst into life, and grow little sprouty tails! When you're satisfied with the size of the sprout, you're done! (You can eat them as soon as the sprout grows as long as the bean. The ones I did, pictured, got a little too long, but were tasty and healthy anyway.)

A few brief words of warning: Raw kidney bean sprouts are TOXIC. They will make you very sick, or kill you, so cook kidney sprouts before you eat them. Other sprouts, such as lentils, peas (whole peas only; split ones don't sprout), adzuki beans, and chick peas are safe and yummy raw. Also, do not feed sprouts of any kind to your pets until you're 100% sure they're safe for the animal to eat. Ask your vet or favorite animal expert. (Apparently bunnies like lentil sprouts, but I wanna check with my vet first!)

Sproutpeople.Com also has a ton of information. You can also get more exotic bean mixes there, as well as fancy supplies. :)

If you want to see videos about sprouting, check out these awesome folks! First, have a look at these wacky New Zealanders' video, which explains it perfectly!


...And, there's also this adorable Canadian girl showing us how to make broccoli sprouts from little seeds!


Sunday, April 5, 2009

No-Sew Sachet for Lazy People


If you’re like me, you absolutely hate to throw anything away.


I believe that clutter can really bring down a person’s positive energy, so I try very hard to work through my packrat tendencies. I have been in a decluttering phase that’s lasted… oh, about half of my life now! I figure that if I absolutely must hang onto certain things, I’d better make sure that they can serve a functional purpose. Hence, my mission to reincarnate old things into new, awesome, functional stuff! Unlike a lot of crafty folks who seem to have infinite patience and dexterity, I’m more interested in instant gratification. In my opinion, the best projects (a) produce objects that are functional, rather than frivolous, (b) can be completed in the space of one afternoon, or even a few minutes, and (a) won’t clutter up my house too much during its creation, or after it’s finished and ready to enjoy!


It is with this spirit in mind that I share my very humble instructions for a sachet that requires no sewing.

Easiest Sachet Ever:

INGREDIENTS:

1 pretty, but mateless, sock
1-2 handfuls of scented stuff – try potpourri, pieces of leftover scented candles, or extra fabric scraps treated with your favorite essential oil
string, yarn, thread, or ribbon (even rubber bands, in a pinch!) — or just use leftover sock pieces


Trim the cuff and everything below the heel off of your sock. This sachet can be made with the heel/toe section, but I like to work with the ankle. Tie off one end with your string/ribbon/etc., and add the scented stuff (I used a handful of leftover junk from my old Frebreze Scentstories discs!). Tie off the top, trimming your sock ends as needed.

Sachets are wonderful for adding a nice little burst of scent to closets and drawers. You don’t need to spend piles of money on fancy little trimmings, but do make sure that you choose a scent that you love and that has some staying power. The simple construction of this type of sachet will enable you to change the scent when it becomes necessary.

I usually keep the leftover cuffs to use as hair elastics, because even those “ouchless” elastics are sometimes murder on my extremely delicate hair. Leftover cuffs are perfect because they’re gentle, and ready-made in colors to match most of my wardrobe. And hey, free hair accessory… one that I don’t worry about losing or breaking!

A word of caution here: DON'T make the same mistake I did, and use a "fuzzy" sock (pictured). If you do, as I have, you will need put in a few stitches to contain any stray sock fuzz. Or you can fold over the ends of the sock to create a finished hem before adding the rubber bands/elastics. These socks were a hostess gift from a lovely relative who stayed with us last fall. I fell in love with those adorable little crocheted flowers, and when the elastic began wearing out, I knew that I’d have to give them a new life!


Friday, March 6, 2009

Review: A Work of Cavi-Art

Last month, Fuzzband regaled me with some of his co-workers’ tales of woe about Valentine’s Day.

Apparently, some girlfriends and wives are harder to impress than others. I’ve always thought that I was definitely one of the more easily satisfied “V. D.”** gift recipients, but I suppose everyone thinks they’re easy to shop for than they actually are. As far as “V. D.” goes, my preferences are usually different than that of other people (OK, except my weakness for jewelry). I love roses because they make awesome potpourri and incense, but having them makes me feel totally guilty ’cause they’re so expensive. (Hell, I’d rather just get some really awesome incense, like from the Holy Rood Guild or something!) Fuzzband suggested that I start making lists for occasions wherein he’s run out of inspirado. Sure, it might not be as fun as a surprise, and a “Gimmie List” makes me feel like a total hog, but the benefits of saving time and money far outweigh my feeling like a selfish ass. And anyway, it was his idea, so that makes it OK. ;)
When quizzed by his co-workers about what he’d planned to buy me for “V. D.”, he replied with an item from my list. ”Vegan caviar,” he said, amid horrified expressions. I guess it’s not as cute and romantic as some stuff, but hey, it’s what I wanted. When you’ve been married for almost 9 years, you stop giving a shit about obscenely priced roses, and although candy is always appreciated, sickeningly sweet heart-shaped boxes just clutter up the house once the candy’s gone. (Jewelry’s okay, though.)
When the big day arrived, I peeled back the packing tape on the beautifully-wrapped UPS box containing my Cavi-Art, and produced 3 little jars of loveliness — one black, one red, and one that resembled ikura (salmon roe). I was surprised to see how good in the closed jar; if the label hadn’t said “Seaweed Caviar” on it, I’d never have known the difference. This stuff looked exactly like the real thing! Of course, looks aren’t everything, so I still had a healthy amount of skepticism.
Some of the reviews I’d seen of this product were all, “Maybe if I chill this first, it wouldn’t suck soooobad,” so I popped it into the fridge, wanting it to be ready for me as soon as I remembered to get new camera batteries. I did, however, sneak a taste of each jar prior to getting batteries… I just couldn’t resist trying it.
The ikura was the first one that I’d tried, and was the focus of one review that had truly worried me. The reviewer mentioned that there was an overpoweringly yucky dill flavor, and the stuff inside had an “oily” mouthfeel. This was not encouraging.
Real ikura is usually a deep orangey-red color. Upon removal from the jar, I saw that the mock ikura was much paler, and the brine that it floated in was very thin and watery, so it needed to be drained before I was able to have a decent sample. It also had these adorable little spotted bits, not unlike salmon roe, but much more obvious than actual ikura. Upon tasting, there was indeed what seemed to be a “dill pickle” note somewhere in there, but it wasn’t too overpowering for me, nor was it much of a turn-off. The balls of fake salmon roe popped nicely in my mouth, pretty similar to the real thing. I’d miss real ikura if I stopped eating it, but this stuff isn’t a bad substitute.
Visually, the red and black “lumpfish” varieties were dead ringers for the real thing. They didn’t have the same strong pickle essence as the ikura, and to me, the red didn’t taste any different than the black. I liked these “traditional” faux caviars a little better; not as salty as actual fish eggs, though they definitely had a strong veggies-in-brine type of flavor. The “eggs” were just the right size, though a bit more firm than the real thing, and yielded less liquid when they popped.
While I do love real caviar, I will definitely buy this product again. There are certain advantages to Cavi-Art, such as:
1. It won’t give you the runs, like regular caviar can. (Is it the high salt content or the cholesterol?)
2. This stuff keeps for weeks, maybe months! Eggs that come from an actual fish are good maybe a week, tops, before they need to be eaten or tossed. Cavi-Art is basically a pickled vegetable which can keep for a long-ass time. The jars that I got were about $8 each, which is a great price for something I don’t feel pressured to hurry up and use before it gets old.
3. The brine in Cavi-Art is clear. Real caviar often needs to be rinsed before using it as a garnish, or else you get nasty-looking fish juice all over your pretty hors d’oeuvre platter. Would my adorable little toast points with herbed creme fraiche look even half as sexy with a bunch of gunk all over them? Hells no!
4. The “lumpfish” style of Cavi-Art is firmer than true fish eggs, so if you stir it into something, the little eggs don’t immediately pop and discolor your food. They’re also easier to manipulate because you’re confident that they’re not going to break at the slightest provocation.
The only real drawback that I can think of is that Cavi-Art could stand to have a little more of a fishy taste; it’s definitely more of a veggie flavor. Even so, I’m still floored at how awesome it turned out to be. I’ll definitely be returning to their USA website for more when the need arises.
**(By the way… can someone tell me when the hell people started deeming it acceptable to refer to Valentine’s Day in its abbreviated form? Are people not aware of what they’re actually saying? Everytime I hear someone call it “V. D.,” it makes me snicker like a 12-year-old who caught her parents saying a bad word. For some of us, I guess every over-commercialized marketing ploy that The Man calls a “holiday” is at least as uncomfortable as an infested crotch — but even still, all of those people cluelessly spouting “V. D.” are pretty entertaining.)

Thursday, February 19, 2009

Making Homemade Incense

Lately, I've been rather enamored of the idea of making my very own incense. I've long loved the resin-based style incense (i.e. dragon's blood, frankincense, copal, styrax, etc.). A few years ago, however, my husband bought me some really delicious church incense from the Holy Rood Guild; two cannisters of the most amazing floral- and wood-based scents in the world, Laudete and Jubilus. (I had wanted to try their third scent, Cantica, but it appears that the monks have stopped selling it to the general public. Darn!)

For my birthday, my husband bought me some lovely "Melchior" resin, and a powder-based rose & frankincense from Scents of Earth. He also got me some beautiful red roses. Each time I get flowers from someone, I have a tendency to let them dry out with the intention of making potpourri. (Whether or not I actually follow through with potpourri is another story!) This time, though, I thought it would be really awesome to try making my very own incense.


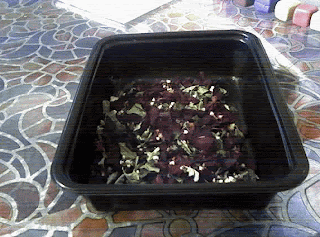
The first thing I did was to take the parts of the bouquet that I wanted to turn into incense. I removed all of the red petals and placed them in a small plastic tray; then I snipped away some of the leaves of the roses, as well as some of the bits of fern "garnish" that came with the bouquet. Then I took a few pieces of the baby's breath and added them whole, figuring that they'd all be crumbled to bits after everything dried. At that point, I was unsure about whether or not to use the bud remnants for the incense, so I decided to trim them from the stems and set them aside and put them in a glass nearby. I could always add them in later if I wanted.


It took about a week for the petal-leaf mixture to dry. I didn't do anything special to help them along, just left them in my little plastic tray. I would toss the mixture around in the tray once each day while I waited for it to dry. From time to time, I also gently mixed the glass of buds, but not quite as often. They're really delicate. They also took longer to dry than the petals. (Later, I decided not to use the buds for this project; instead, I saved them for a similar but related mini-project.)

Of course, the petals didn't smell as good dried as they did when they were fresh, so I knew I'd have to add some yummy scent to the mix. First, though, I crushed all of the petals, leaves, and baby's breath into a fine consistency. (It's more coarse than powder. Just a bunch of little bits.) Then, I added some Egyptian Rose essential oil, and a few drops of clove oil for a little extra dimension. I mixed it up really well, and then tried it out on my burning charcoal. It was awesome! I've already got ideas for the next batch of incense!! :)
Related Posts Plugin for WordPress, Blogger...