Showing posts with label easy. Show all posts

Saturday, July 26, 2014

Fresh Blueberry Cobbler for the Bakingly Challenged

A cozy home scene: Baked goods and skulls!
I once had a recipe for "mock cobbler" that rocked my damn world.  No idea where the hell it went, though.  Someday I'll find it again, maybe.

But this is a story about blueberries.  I am not a big blueberry fan, having eaten about 9 thousand tons of them one summer afternoon in my youth.  My older brother and I were afflicted with the worst attack of food poisoning that the planet had ever known.  Fortunately, our vomming urges seemed to be in perfect sync; first one of us would have to run to blow some blueberry chunks, and then a few minutes upon that kid's return, the other would begin to heave.  We gave one another reports on the color, amount, and consistency all afternoon until finally, the torturous barfing finally ended. 

But, I digress!  I recently came into about 3 pounds of blueberries that needed to be used up before going bad!  At first, my plan was to make a lovely pie or two, but bugs in the flour ruled out that option.  (Despite the bonus protein that the bugs provide, I've gotta draw the line somewhere.)  Here's a great recipe for blueberry cobbler that hopefully won't remind you of the above story.  I did find a box of bug-free Jiffy mix, so decided to make cobbler instead.  I divided the batch into two pie plates to make it seem more pie-y.  Why the hell not?

Hopefully, the recipe below won't remind you much of the Vomit-Fest story above.  If you visit me and I bake this for you, eat all you like -- I still have an aversion to blueberries!

INGREDIENTS:
3/4 cup of water
1 cup of flax milk
4 cups of blueberries
4 tablespoons of butter
3/4 cup of sugar
2 cups of Jiffy biscuit/baking mix
1/2 teaspoon of salt
1 teaspoon of cinnamon
1/4 teaspoon of ginger

Here it is, all raw and yummy. No canned pie filling required.   
DIRECTIONS:  This is super easy to make!  First, preheat your oven to 400 degrees.  Spray your cobbler dish (or use some pie plates like I did) and put your blueberries in the bottom, then sprinkle with spices.   In a separate bowl, mix the Jiffy, salt, and butter together until it's grainy and pea-like in consistency, then pour in the milk and continue to knead until the milk is thoroughly incorporated.  Crumble (or rip apart) the biscuit mixture, and then add dollops of it to the top of the berries.  Then, sprinkle the sugar over the biscuit blobs and berries.  Pour the cup of water over the whole thing, and pop into the oven for about 35 minutes.  (I turned my oven off and allowed the dishes to stay in there for a little while after.)

The recipe yielded a cobbler that was a bit runny, but still not bad.  The biscuit bits were surrounded with delicious berry syrup, and it wasn't too cinnamon-y for me.  Next time, I think I'll add my spices to the sugar, or at least sprinkle a little cinnamon on the top of the cobbler.  I may also mix the blobs and berries together next time, just to see if it makes a nicer variation in consistency.

Btw -- the original cobbler recipe can be found here on the Jiffy site.  I added my own twist to it, but the good news of it is that you can use pretty much any fruit that you've got, even mix it up, as long as you get to about 4 cups of fruit.  Pretty awesome, eh?

This dessert microwaves well the next day, too, by the way.


Friday, April 25, 2014

Emergency Guacamole!


It only has 2 ingredients, and it looks pretty disgusting when it's done, but it scratches the guac itch!!

First, you need a ripe avocado and a bottle of Cholula chili-lime hot sauce. (OMG. I love it -- I could *drink* this stuff!!)

Mash the living hell out of the avocado and add as much sauce as you can stand!


When it's done, might look kinda brown. (If you care, add some cilantro, green onion, even parsley or tomatillos to even out the color.)

Close enough! :)

Tuesday, December 31, 2013

Making Cook and Serve Pudding in the Microwave

Yes, it can be done! My results may not be your results, though.

First, I whisked my milk and "cook & serve" pudding together. Then I placed it in a tall plastic container... It's important for your container to be tall! Otherwise, the pudding is going to overflow and it'll be all over the microwave.

My microwave is one of those spinny rotating ones.  I put the mixture in for 2 minutes on the microwave's normal setting, then brought it back out and whisked it really good. By this time it was very well blended, and had bubbled while cooking, but still remained very thin.

When I placed it back into the microwave this time, I did it for 3 minutes. After half the time, the pudding had risen to the top of the container, so I took it out and whisked away the lumps. This is a picture of what it looked like right after -- seems to work just fine! After it cools, I'm using it to make fruit dip for a party I'm attending tonight.

My advice is to watch that sucker, and whisk it good between nukes. Give it a try and let me know how it goes. :)

Wednesday, November 20, 2013

Lesser Carb Cheddar-Squash Casserole


One quarter of this ENTIRE recipe is under 500 calories for a great dinner in and of itself!  You can also eat a half serving (one eighth of the batch is about 240 cals) for a satisfying, cheesy side dish that is still packed with veggies.

INGREDIENTS:

*2 cans of cream of chicken soup
*1 4-oz can of green chiles
*20-oz bag of frozen squash
*Big bag of broccoli/cauli mix (can't remember the ounces, but I think my bag was about 4 cups of frozen veg.)
*2 cups of shredded cheddar cheese
*1/4 box of Dreamfields Spaghetti (I think that's about 3 ounces of dry pasta)
*whatever herbs and spices you like! (I used garlic and dill in mine.)

Preheat your oven to 350 and get your pasta water boiling.  Pour your chicken soup into the bowl.


Next, season that sucker!

I also added a little "hamburger seasoning salt" but next time I will figure somethjngn else out. Between the cheese and the chicken soup, you're looking at over 1K sodium for the dinner serving.

Mix things thoroughly and start adding squash.


Now, just when you think it cannot possibly look more like vomit, add your broccoli mix and half the cheese.


Add your pasta (which should be cooked according to directions -- you can shave off a minute or so, since this is going into the oven).  Add the remaining cheese.


Now it's ready to pop into the oven!  I baked mine uncovered for about 30 minutes, since I defrosted my veg first, and the only real thing was to let the cheese melt.  If you begin with frozen veggies, try cooking it covered for 30-45 minutes, then uncovered for another 15.


Eat and enjoy!  Relax... A big serving is 50 carbs (which isn't bad at all for a pasta meal), and a small serving is just 25 carbs!  If you use Dreamfields like I do, your net carbs will be even less.


Friday, October 11, 2013

Breakfast Polenta Recipe

I freaking LOVE to eat polenta!  Usually, I eat it as it's in its mushy state... Instead of a heap of pasta or mashed potatoes, I'll opt for polenta to be the bottom against my sauce's meaty top. Heh heh.


Last week, I had a vegan dinner party and decided to use polenta as a crust for my cottage pie.  (It was yummy and I was lazy!).  I was left with about 2 cups of yummy corny awesomeness to use later.


The first thing that I did was to unmold it and consider my options.


Then I sliced it into pieces, added a little olive oil to a hot pan, and got to work! I think it was about 5 minutes before I needed to flip.


They started looking better!


Not all flipping was successful.


It really started to get awesome after a few minutes on the other side.  A cast-iron skillet is the way to go.


After a tiny sprinkling of salt, I was ready to eat! This was a very filling, happy, and satisfying breakfast that I can't wait to make again sometime.


 (Oops: here's the recipe! Take 2 cups of polenta {1/2 cup of cornmeal stirred into 2ish cups of boiling water; add seasonings of your choice}, pour it in a container & allow to chill overnight or longer, unmold, cut into strips, and cook with about a teaspoon or two of olive oil, high heat, about 5 minutes per side. You can flip again to lock in the polenta-y goodness, but that's optional. Dash with salt, serve, and eat!)

Saturday, December 15, 2012

Picadillo Time!

Well, it's been a few months... and I've done a few things that I've wanted to post sooooo badly!  But for some reason, I've been kind of lethargic about that stuff.  I think the relocation just hit me harder than I realized it would!

But, after weeks of being like "Oh, this would be such a fun thing to post on PGS!" today I was like, "Screw this, even my humble dinner recipe HAS to be posted!"  So today, since a bad cold has been kicking my social circle in the ass all week long, my friend Fluffy and I decided to make some yummy spicy picadillo for dinner.  Fluffy and I shared the picture-taking duties.  Here's my recipe, and no, it's not really authentic at all.  But it IS inexpensive, forgiving, great for when you have (or need) lots of leftovers, and aside from the ridiculous amount of sodium, can be quite nourishing and yummy.

INGREDIENTS:

Solids:
* 1 lb ground beef (preferably quite lean, 'cause draining it is a pain in the ass)
* 1 lb ground turkey
* 1 10-oz package of Morningstar Farms "Grillers" crumbles (or your fave equivalent)
* 2 huge-ass chopped red, white, or yellow onions
* 1 red and/ or green bell pepper (use half of each, or one whole one of each if you love peppers... you could even go crazy and add a couple of jalapenos or banana peppers)
* 1/2 cup diced celery with chopped-up leaves for flavor
* a few tablespoons of capers
* 1 1/2 whole kosher dill pickle, or 1/2 cup olive style of your choice (I want olives, but Abil {A Boy I Like} has a psychic allergy to them, so pickles it is!)

Liquids:
* 1/2 cup wine; marsala is recommended
* EITHER the small can of tomato paste (how many ounces is that? 6?) or a 14-ounce can of chopped tomatoes
* water
* A splash of red wine vinegar or pickle juice -- hell, use both like I do!

Spices:
* 1/2 teaspoon crushed dried rosemary
* 1 tablespoon dried garlic or garlic powder (use to taste; I like a lot)
* anywhere between 1 and 5 bay leaves; use your favorite number.
* a big pinch of allspice & a big pinch of clove (optional but yummy)
* 1 1/2 tablespoons cumin
* 1 tablespoon paprika
* 1/2 teaspoon black pepper
* 1/2 teaspoon chili powder
* 1 teaspoon hot red pepper flakes (use to taste)
* 1/2 teaspoon oregano, thyme, or basil
* Optional: a few drops (or gallons) of Frank's hot sauce!
* Also optional:  A packet of Sazón Goya, for that delicious hit of MSG.  I would avoid adding any additional salt, as the pickled stuff and cooking wine has plenty.

Gases:
Not 'til later! ;)


Step 1.  Chop that onion and celery, get it sweating over the stove!  Use some olive oil if you have it, or just a bit of cooking spray.  Medium or low heat should do it.  Cook until the onion is see-through-ish and/or brown. 

Step 2.  Dice your peppers, process your pickles (either digital or analog methods will work fine), and get your spices ready while you wait for the onions to be translucent. 


Step 3.  Toss all that shit -- your peppers, your spices (except the Goya, the bay leaves, and the Frank's) -- into the pot!  It's better to put your spices in while the veggies are cooking so that they get coated with delicious seasonings right away. 

Step 4.  Add your tomatoes and/or paste, swirl it around until it's evenly mixed.

Step 5.  Add meat, breaking it up into luscious chunks.  Turn up the heat if you need to.  If you want a vegan recipe for picadillo, you can always substitute your favorite meat analogue for the turkey and beef as well; nothing else in this recipe is animal-based.  I have tried it both ways, and it's awesome no matter what protein you like.

Step 6.  Here is where you add everything else: the wine, the vinegar, the "Grillers," capers, pickle, bay leaves, Sazón if you choose to use it, and just a bit of hot sauce -- you can adjust the heat later.  Stir everything up until it is mixed well, then add plenty of water.  Ideally, you want the entire mess to be completely covered and then some.  (This picture was taken after about 45 minutes of simmering, so keep that in mind.)  At this point, get the heat to medium-high, and then turn it to low after it has begun to boil.  Stir it now and again as it simmers, making extra sure to scrape the crap at the bottom of the pot so it doesn't stick and burn.  No one likes a ruined picadillo, except maybe your pet rats, but they really shouldn't be eating onions or garlic.

Here it is, bubbling frantically on the back burner!  It's almost done after about an hour...  Keep stirring and waiting.  I bet your kitchen smells awesome right about now!  Reminisce with your friends about how, years ago, this would be right around the time you'd be getting ready to go out clubbing... and then you eventually had other things consuming you, like arthritic hips and finding ways to pay for your Geritol addiction.  Ahh, memories!

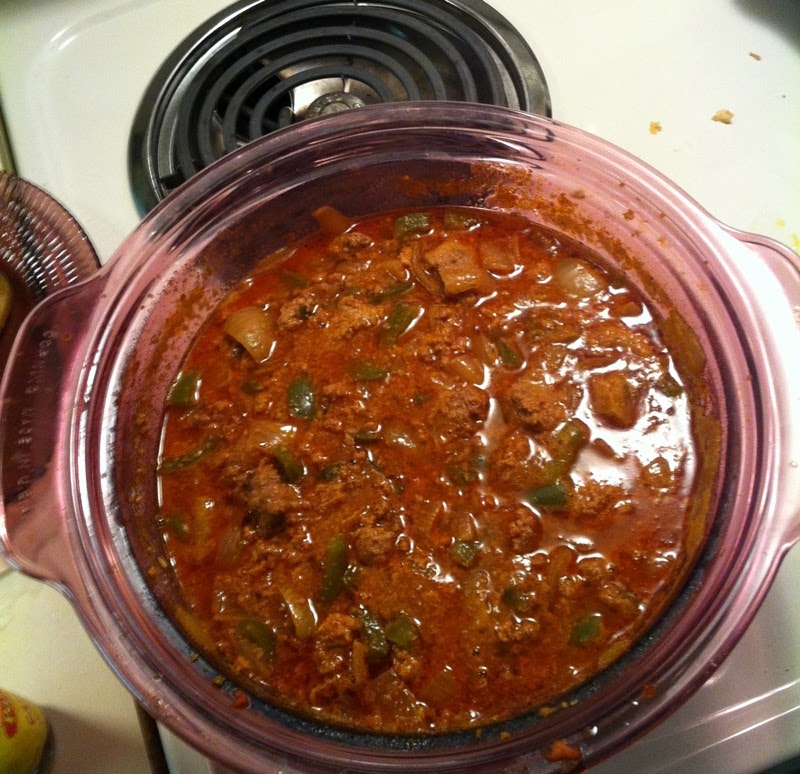
And now, approximately an hour and a half after adding the water and crying over your lost youth, the picadillo has come to the perfect consistency: The liquid has reduced beautifully and everything has come together perfectly, so now it's almost the consistency of chili or a dense meat sauce.  There will still be some yummy liquid floating around in there, but it's fine and delicious.


 DONE!  Serve over rice and enjoy it!  (Also, marvel over how your new iPhone makes everything look 109482983958 times nicer than the crap-ass old cell you used to take kitchen pics with... wow!)

Tuesday, April 3, 2012

Lazy Chocolate Ganache

Another thing that I made for my dinner party last month was a tasty chocolate-orange trifle, which I topped with homemade ganache.

If you've never made your own ganache, you simply MUST try it.  It's so much easier than homemade icing, and for al its elegance, doesn't cost much to make either.  Even if you're afraid of melting chocolate, you can easily do this.  My friend Martha Stewart shows you how on her website here.

My recipe is a tiny bit easier, but a basic ganache recipe is super easy to begin with!

First, get yourself a 12(ish) ounce bag of chocolate chips -- milk or bittersweet, it doesn't really matter.  Use what you like.  For a firmer ganache, use the whole bag; for a looser one, use about 2/3 of the bag. 


Whirl the chips around in your food processor until they're nothing but chocolate dust.


Pour the dust into a good-sized mixing bowl.  Have your spoon or whisk ready!


Microwave a cup of heavy cream until it boils, then whisk the cream into the chocolate dust until everything is completely melted together and the mixture is smooth and glossy.  Yum!


 Let it cool for a minute or two if you're drizzling it or using as a dip or coating.  Then feel free to dip, drizzle, whatever!  Or you can do it like I did, and pour the entire thing over a trifle.


Admire the smooth, glossy surface.  Fantasize about being the size of a 
Barbie doll and ice-skating on a frozen pond of ganache.  Aww yeah!


If you're making something that requires harder ganache, put it in the fridge until it's firmer.  When it's harder, it can be used to make your own truffles, or to frost or fill a cake. 


Monday, April 2, 2012

A Bloody Good Dinner

A couple of weeks ago, I celebrated St. Patrick's Day with a small dinner party consisting of myself, a boy that I like, and 5 really cool friends -- or 7, if you count the babies!  The fare was authentic Irish food (and Irish-American dishes) including shepherd's pie with poundies, corned beef and cabbage, barley with peas and herbs, potato candy, and 2 savory puddings, black and white.  I also made potato candy and a chocolate-orange trifle (recipes to follow in another entry).

I'll give you my white pudding recipe next time, but in this entry I want to explain my process for making black pudding.  For those of you who have never tried it, you should DEFINITELY give it a shot.  And if you've eaten it but never made your own, I'd recommend trying that too; it's a really visceral experience.  (Ha, ha.)

While blood is actually considered tissue in the body, as well as offal in butchering terms, I'm still categorizing this entry under "organs" since it's often sold and processed with the organ meat anyway.

For years and years, I've wanted to make black pudding.  But it can be tough to find a good blood provider.  I have seen pork blood for sale at the local Asian grocery, but I've always been reluctant to purchase it -- their meat always looked kind of old and sad, unlike their very fresh fish department.  However, a few years ago, I was given the phone number of Blood Farm, which is local and has a slaughterhouse on premises.  (It is a farm which is owned and operated by the Blood family -- by coincidence, it's also a place where one can buy blood and guts!)  Unfortunately, we missed pig slaughtering day, so no dice for pork blood.  However, they were slaughtering cows the day before we called, so I had my man order a quart of beef blood, with a bit of salt in it to keep it from congealing.

The next day, he came back from Blood Farm with a large plastic bag, which was tied with a thin rope and filled with an indeterminate amount of cow blood.  It was still warm!  What a grisly sight indeed... I almost couldn't process the blood.  (I did say ALMOST!)  I cut the rope, and ever-so-carefully poured the blood into a plastic container.  Turns out that for six dollars, I received nearly three-quarters of a gallon of delicious beef blood.  Mmm mmm, good!

After perusing a number of recipes online, I pretty much made up my own recipe, using this black pudding recipe from Phebotomist as a reference for cook times and blood-to-filler proportions.

I mixed my blood together with milk, bread, barley, a bit of flour, some butter (instead of suet), and lots of yummy chopped garlic with other seasonings.  Then I stirred everything together in order to mix it as thoroughly as possible.  All of the black pudding recipes that I found online called for oats, oat flour, or "fine oatmeal", but I had used up all of my oats on the white pudding.  So, I decided to improvise and use a few cups of Cheerios as a substitute. Breakfast of champions, my friends!

Then, the pot of bloody Cheerios was whisked away by my man, who put the whole thing onto the stove as he stirred it over a medium flame.  It was supposed to darken, but after a few minutes of the two of us looking back and forth at each other, going "WTF?" over a blood-red Cheerio stew, the mixture began to bubble and foam up a bit.  Then out of nowhere, up came a huge black bubble!  After some vigorous stirring, the rest of the mixture followed suit.  He then poured the mixture into one of our large casserole dishes -- I couldn't believe how much this recipe yielded, by the way -- and amazingly enough, many of the Cheerios remained intact!  In fact, the whole mixture looked quite a lot like brownies with a passel of Cheerios gaily festooning it here and there. 

The next step was to let the mixture sit in the fridge for awhile, and then to cut it into slices and fry it.  I thought that the blood pudding tasted fantastic, sweet and meaty and buttery.  In fact, it reminded me quite a bit of "the orange stuff in stuffed derma" (sorry, can't remember what it's called).  But it was far too greasy for me to enjoy it quite as much as I wish I had.  I don't think that suet would have melted as quickly as butter had, during the cooking stage.  However, next time I make this (and that day won't be toooo far off!), I think I'll just omit the butter/suet component during the first act.  It was also very soft, which I didn't really mind, but stuffing it in casing will make for a much yummier eating experience next time.  But all in all, I'd call this attempt a success!

I already have another small batch of ideas for cooking with blood in the future, so watch this space for the dirty details. :)

Saturday, March 3, 2012

Our Elegant Spa Party


Some friends and I have recently begun to host a monthly get-together where we all use our talents for the enjoyment of our guests (and their friends).  Between us, we have an asthetician who does waxing and other spa treatments, a hair stylist who does awesome cutting, a professional masseuse who's always very in demand, and a professional psychic (that's me!).  Since the spa and hair specialists are next door neighbors, we use their apartments and just keep the door open between the two of them.


I haven't made a lot of money at this gig, but it sure has been fun!  Since two of the ladies are hosting (and have to get everything ready), I've been given the honorary chef's hat.  Last month, I made stuffed mushrooms and a veggie sushi platter (which, unfortunately, I got nooooo good pictures of!), along with some luscious fruit skewers of strawberry, papaya, and kiwi.  But this month I really wanted to do something elegant.

My savory dish was mini-quiche in two flavors: Lorraine and Florentine.  They were very easy to do, and lent a very "elegant teatime" vibe to my vintage goodies tray.  (I used a Bisquick recipe, though substituted Jiffy mix; worked great!)  For the fruit portion of the spread, I decided to make parfaits with a fruit dip which was once said to "drive everyone mad with lust!"  I ordered plastic wine cups from Oriental Trading Company and they made wonderful little parfait glasses.

We also had some simple cheese and crackers -- some nice pepper jack and yummy Babybels paired with the most scrumptious rosemary crackers I've ever tasted.  Carr's rosemary crackers are amazing; if you haven't had 'em yet -- definitely pick some up the next time you get a cracker craving!  Another party guest brought some pineapple platters featuring a stunning array of fresh tasty crudites with two kinds of hummus.  My favorite is the garlic lover's, YUM! :)

All in all, it was a really fun afternoon!  If you live in the Boston area and want to be invited, feel free to let me know.  Our website is at http://www.DawnSoul.com and we always have room for another friend. :)


Sunday, January 29, 2012

Food For Thought

If you know me, then you probably know that I'm a sucker for a good cause.  I have been donating stuff, making calls, writing letters, babysitting people's kids or pets, scrubbing floors, baking, cooking, taking phone calls, mailing packages, stuffing envelopes, making or accepting donations, comforting people or animals, knocking on doors, moving shit, picking up trash, and generally being what some people refer to as a "do-gooder" for over two decades now.  I even did volunteer work for a Free-Net in the 1990s!  (Do those things even exist anymore?)  Truth be told, I'm not really sure where I came upon this habit.  It's just kind of the way things have always been.

You may also know that I love to cook.  Back when I was more mobile than I am now, I was the kind of person who'd throw elaborate dinner parties, with multi-course meals featuring an insane amount of choices for my guests.  Or I'd just cook for my husband, who often disliked exotic or unusual foods; he also isn't a fan of leftovers, so much of the time, the stuff I'd make would eventually depart this world via the garbage disposal, as opposed to the toilet, as a good meal should.


I view cooking as an art form; an extremely temporary and short-term way to get the gratification of making something, without the hassle of storing it forever or figuring out how to put it to good use.  You cook the food, you (or the people you love) eat the food, you toss the leftovers.  And if there were actually people to cook for -- oh, happy day, like when my husband's workplace used to have their holiday parties -- I would bake cheesecake for days, thrilled to impart some of my happy vibes into the dessert assignment!  (I miss those times!)  But, how sad it is to cook food that might not get eaten.  So for the longest time, I have wanted to help out at a shelter or a food pantry.
Upon finally learning of a shelter that accepted donations of cooked food -- something which hadn't really occurred to me until then -- I decided to roll up my sleeves and make something good.  I did an enchilada casserole, which was basically ground turkey in beans and rice, with some cheese and spices.  It wasn't a lot of food -- only one little tray, which might have feed half a dozen hungry folks -- but I was still proud to make something good for someone.  It was such fun that this month, I decided to have a cooking party to prepare something good for the shelter.  And yesterday, that's just what we did!

I am still battling with phone issues, so I didn't get any pictures.  But I will say that we had an absolute blast.  And so many friends helped out -- one of them went out of her way to do our shopping and kicked in 20% of the food bill!  Another friend helped to straighten up the house in a hurry, played chauffeur to a partygoer in need of a ride, donated some surplus canned food, and ran a bunch of errands.  We even had a friend drive from 40 minutes away to help me peel apples, chop celery, and dice onions.  And of course, there was my man with his mighty chili-stirring arm.  Between all of us, we were able to produce 6 trays of food -- that's 3 apple-raisin noodle kugels and 3 turkey-chili tamale pies -- for the Lowell Transitional Living Center.  I didn't get to come along for the food delivery since I was hosting, but I was told that the chili received an especially enthusiastic welcome.

Things went so well that we've decided to do it all over again next month.  I haven't decided yet what we're going to make.  I'd also love to have some more volunteers and/or food donations.  I paid for almost everything myself.

One thing I would suggest to readers, though: If you want to volunteer to do something, don't think "there's nothing I can do."  I have to take it slow even on my best days, and then there are days when I hurt so bad that I can't even get out of bed -- in fact, I tend to stay inside almost all of the time because of my health issues.  But I didn't let that stop me from helping; I brought the playing field onto my turf instead, and made my own volunteer event.  Anyone can do it, really.  And if you're feeling particularly down about your own life, isn't it nice to stop worrying about your own problems for awhile & do something to help people who are even more screwed than you are? 

I can't cook the way I used to, but I was certainly able to get onto Facebook, invite my friends to come for a volunteer party, and then put their asses to work! :)  The point I'm trying to make is that you CAN do something.  And even if you don't think the stuff you can do is worth very much, there really are people out there who can benefit from it.  You just have to know where to look.  Trust me!

P.S.  I used a variation of a Wendy's chili clone in my tamale pie.  All I did after that was make the crust (boil 4 cups water, add 1 cup cornmeal & spices if you like, then stir until thickened), pour the crust in the tray, top with chili, & add the cheese.  It was a very easy recipe for a crowd!

Monday, January 16, 2012

Q: What Do Disco Bandits Eat? A: Disco Fries!


Ordinarily, I try to eat healthy. Honest, I do! Recently I joined Bat Fit 2012, so my next few recipes should be much healthier than this one.

One of the things that I make during hectic holiday seasons is Disco Fries, which I did a little while before my phone died. It is a spectacularly unhealthy dish which I make only rarely, but wonderfully easy and tasty. This is my thrice-yearly guilty pleasure -- especially comforting when the weather's cold, and our day has been busy and tiresome. I usually have the Disco accoutrements on hand, all we need to do is pick up a big order of our favorite spicy fries.

And, before you ask... no, I'm not exactly sure where the term "Disco Fries" originated.  All I really know is that while there are various versions of cheese fries in America and, indeed, the world, fries which are topped in a cheese and brown gravy are known as Disco Fries in the NYC area.  One thing I do know is that if you're getting ready to don some sparkly bell-bottoms and bust a move at your favorite discotheque, you'll need lots of dairy and carbs to keep your booty shaking all night long!

INGREDIENTS:
spicy fries -- a serving for as many people as you're feeding!
shredded cheddar cheese
brown gravy (make your own, buy it, steal it... whatevz!)

You can buy some fries at your favorite fryery if you're feeling lazy and/or want that great factory-fresh taste.  Even McDonald's would be OK, but if you can find or make spicy fries, it'll be even better.  After they have been purchased or prepared, place them onto individual plates, and spoon some brown gravy over the fries.  Then sprinkle some cheese over the whole thing.

I've heard that some people melt the cheese in the broiler in the oven, but I just microwave mine for about a minute; I like my cheese a bit on the firm side.  The trick is to keep your little eyes on it, so that it doesn't burn or get nasty.  Just let the cheese melt and the gravy bubble, while feasting your eyes on the majesty of Disco Fries.  Then remove from your heat source, let it cool for a few minutes, and enjoy!

I will leave you now with the Disco Fries song by Parry Gripp, to prepare you for this culinary odyssey.


Monday, October 10, 2011

First Pumpkin of the Season!

Well, I am proud to announce that this week, I was able to get myself to Agway with some friends and purchase the lovely pumpkin below.  (No, it wasn't pre-cut; I did that yesterday.)  It came without a stem, but I like it anyway!

I was thinking about doing a jack o' lantern featuring my business name, but decided to do a PGS jack o'lantern this week instead, just for a bit of practice.  I actually think it turned out fairly well.  The only tools I used were my pen, my knife, & pumpkin scraper.  The letters were freehand -- the little loopy part of the "P" in "Pretty" fell off while I was cutting it.  I have another picture where I stuck it back on with a piece of skewers left over from summer's choochacheechachoo, but I was too lazy to put it up. ;) I wound up having a ton of little pieces of leftover pumpkin from the letters, so I'll be putting those in my crockpot today.

Anyway, here's the first of many of the 2011 season.  I'm already trying to decide what to do with my next one!


Mmmm, smell those fresh pumpkin guts! :)


Wednesday, June 15, 2011

Pooping Rainbows


I've had some pictures for over a year, and decided to FINALLY post them onto PGS.  The inspiration for this project came from... well, I have no idea, actually.  But I thought, "Wouldn't it be cool to cut into a cake and have it be all rainbowy and stuff?"   And no, these ones aren't mine... these NEXT ones, with the cake all cracked and messed up... yeah, those are mine! ;)


Even though I came up with the idea on my own, it wasn't totally original. Turns out that others have also thought of baking a rainbow into a cake... and many pictures of rainbow cakes have been popping up all over online! I had originally planned to make my own cake from scratch, but after I baked it I thought, what the hell -- I'll use a mix next time. A bit of research has yielded the now (somewhat) famous rainbow cake thread over at Something Awful, as well as the how-to step-by-step guide over at Omnomicon. Apparently, all you really need to do is add a 12-ounce can of clear soda to a box of cake mix, bake according to instructions, and you're done! I did my cake the old-school way with eggs and oil, 'cause that's just how I roll. But next time, I'll give the soda trick a try. Someone also commented about using club soda and/or seltzer, which would be nice if you don't want your cake to taste like Sprite and/or 7up.  


Rainbow cake is renowned for its 
lash-growing & teeth-whitening abilities. 
 If you don't believe me, just ask this 
cake-tasting supermodel! :)
My cake didn't turn out so well (hence the "fail" label), but that's because my springform pans suck; I have to buy YET ANOTHER SET someday, so we'll see how that goes in due time. :)  The entire surface got a series of big ol' splits across the top, which I filled in with a shitload of chocolate icing.  I didn't get a picture of the finished product, or of the cake after it had been cut; the person to whom I'd gifted the cake failed to honor my requests for more images of it once it had been cut. So it was a big fail all around; maybe next time it'll work out better.  I have a few friends' birthdays coming up, so we'll see how that goes.
You show that rainbow cake who's
boss, Guy With Beard And Pretty Eyes!
I'm going to try the simpler method next time and let you know how it goes.  The other thought I had was, wouldn't this be a cool idea for holidays -- the 4th of July (red, white, & blue cake) and Halloween (orange, green, purple?) come to mind as fantastic ideas for this cake project.


I know that there are a lot of pictures in this particular entry, but I just had to show them to illustrate how totally cool this project is.  If you have never baked a rainbow cake, give it a try.  It's a fun surprise when you cut into the cake, and all of those colors are inside.  Very festive indeed!  Pics of the more successful rainbow cakes are courtesy of  Rev Dan Catt, Better Than Bacon, & Justgrimes.  Thanks everyone, for sharing your masterpieces! :)
Related Posts Plugin for WordPress, Blogger...