Showing posts with label the fine and illustrious art of using shit up. Show all posts

Saturday, July 26, 2014

Fresh Blueberry Cobbler for the Bakingly Challenged

A cozy home scene: Baked goods and skulls!
I once had a recipe for "mock cobbler" that rocked my damn world.  No idea where the hell it went, though.  Someday I'll find it again, maybe.

But this is a story about blueberries.  I am not a big blueberry fan, having eaten about 9 thousand tons of them one summer afternoon in my youth.  My older brother and I were afflicted with the worst attack of food poisoning that the planet had ever known.  Fortunately, our vomming urges seemed to be in perfect sync; first one of us would have to run to blow some blueberry chunks, and then a few minutes upon that kid's return, the other would begin to heave.  We gave one another reports on the color, amount, and consistency all afternoon until finally, the torturous barfing finally ended. 

But, I digress!  I recently came into about 3 pounds of blueberries that needed to be used up before going bad!  At first, my plan was to make a lovely pie or two, but bugs in the flour ruled out that option.  (Despite the bonus protein that the bugs provide, I've gotta draw the line somewhere.)  Here's a great recipe for blueberry cobbler that hopefully won't remind you of the above story.  I did find a box of bug-free Jiffy mix, so decided to make cobbler instead.  I divided the batch into two pie plates to make it seem more pie-y.  Why the hell not?

Hopefully, the recipe below won't remind you much of the Vomit-Fest story above.  If you visit me and I bake this for you, eat all you like -- I still have an aversion to blueberries!

INGREDIENTS:
3/4 cup of water
1 cup of flax milk
4 cups of blueberries
4 tablespoons of butter
3/4 cup of sugar
2 cups of Jiffy biscuit/baking mix
1/2 teaspoon of salt
1 teaspoon of cinnamon
1/4 teaspoon of ginger

Here it is, all raw and yummy. No canned pie filling required.   
DIRECTIONS:  This is super easy to make!  First, preheat your oven to 400 degrees.  Spray your cobbler dish (or use some pie plates like I did) and put your blueberries in the bottom, then sprinkle with spices.   In a separate bowl, mix the Jiffy, salt, and butter together until it's grainy and pea-like in consistency, then pour in the milk and continue to knead until the milk is thoroughly incorporated.  Crumble (or rip apart) the biscuit mixture, and then add dollops of it to the top of the berries.  Then, sprinkle the sugar over the biscuit blobs and berries.  Pour the cup of water over the whole thing, and pop into the oven for about 35 minutes.  (I turned my oven off and allowed the dishes to stay in there for a little while after.)

The recipe yielded a cobbler that was a bit runny, but still not bad.  The biscuit bits were surrounded with delicious berry syrup, and it wasn't too cinnamon-y for me.  Next time, I think I'll add my spices to the sugar, or at least sprinkle a little cinnamon on the top of the cobbler.  I may also mix the blobs and berries together next time, just to see if it makes a nicer variation in consistency.

Btw -- the original cobbler recipe can be found here on the Jiffy site.  I added my own twist to it, but the good news of it is that you can use pretty much any fruit that you've got, even mix it up, as long as you get to about 4 cups of fruit.  Pretty awesome, eh?

This dessert microwaves well the next day, too, by the way.


Wednesday, October 2, 2013

Keeping Those Monster Cereals Fresh!


I'm the type of person who loves Halloween.  I mean, loooooves it!!  (You can tell by all of the cool pumpkin and Halloween-related shit that I post here.)  When the the General Mills Monster Cereals became "restricted" to seasonal items only, I was super sad.  But, when it becomes available once again, I get very happy.

One thing that I do not looooove, though, is trying to reduce my carbs.  I have recently lost about 25 pounds, and I still have many more pounds ahead of me.  So, when the craving for something sweet hits me, cereal can often hit the spot (Count Chocula, I'm specifically looking in your direction!).

My biggest problem with all cereals is that, by the time they get to the end of the box, they're all stale and yucky and gross.  Plus, I hate cereal dust!  I've fixed this problem by biting the bullet & buying plastic "snack bags" for those days when I need to take my food with me.  They work great with cereal, too, for those times when plunging a hand into the cereal box and scarfing down who-knows-how-many grams of sugar just isn't going to cut it.

I am storing my single-serve "100 calorie packs" in the boxes that the cereal came in.  After these are done, I'll get some Frankenberry and maybe even some Fruit Brute!  These will ensure that my breakfast is fresh and spooky for weeks and weeks to come! :)

Wednesday, August 28, 2013

Chicken Carcass Soup

Last night, I had a delightful rotisserie chicken! (Yay!) But, it was overcooked. (Boo!) It still tasted pretty good (yay!), but quite a bit of it was inedible due to the scorched parts (boo!). I decided to make some bean stew later this week (a la "Recipe for a Snowy Day")... Which is not only a great way to use up those blackened bones and dried-up meat and shrivelly chicken skin, but also a fab way to get the nasties out of the fridge as well!!

I started by picking all of the usable meat off the bones -- I'll eat that for dinner tonight -- and threw all the rest of the carcass into my trusty crockpot. Some of you might be aghast that I didn't toss that tasty browned skin -- but I never do! I always let the skin simmer with my broth, and after everything is strained and cooled, I just skim the fat from the top. It couldn't be easier, and the broth turns out virtually fat-free this way.  And even the littlest bit of extra flavor helps.

I also added the woody stalk pieces to some asparagus that's been staring me in the face a little too hard... (Because, again, it's all getting strained... Why not add what you can't eat?)

... As well as the green leafy ass-end of my beautiful cauliflower.  (Not pictured: the bug I found clinging onto a floret for dear life!)

Then, I grabbed the ass-end of my celery and chopped it up too.  By the way... You know those green and yellow leaves that you toss whenever you chop celery? Shame on you! ;)  I always use mine in broths, soups, and stews for extra flavor. You should try it!

Last (but certainly not least), I gutted the nasty parts out of a sweet potato before coarsely chopping it and adding it to the mix.

Once the veggies were put into the crockpot with my carcass, I added some liquid.  Add whatever makes you happy -- chicken or veggie broth that you already have, water, booze, anything.  I had frozen a couple of cups of "onion broth" which came from my day-long onion simmering session a few weeks back... It will make a tasty addition for sure!  Tonight, I will soak my dry Lima beans and tomorrow we'll have a yummy, healthy, homemade dinner.

That's all for now. Happy broth-making! :)


Wednesday, May 8, 2013

Bath & Body Works Haul! :)

Well, it's been awhile since I've posted!  (Notice how all of my most recent posts seem to have that in common?)  I have been crazy busy over the past few months.  Lately I've been immersing myself in so many new projects that I haven't been as crafty as usual.

However, I've decided to start also doing product reviews more often, since that way I can still touch base with all of you, and share tales of my amazing adventures! :)

My latest and greatest in the world of mail-order has been a purchase at Bath & Body Works.  I have never actually bought anything from B&BW, but my friend Dax loves their antibacterial hand soaps. They go on sale quite frequently, and this time they were going 6 for $20, so I figured I'd give 'em a whirl.  My plan was to keep a few and share some with her.  Don't they look lovely?

I kept the Italian Lavender, Fresh-Picked Herbs, and Bella Flora.  She received the Sweet Pea, Fresh-Picked First Blooms, and Aqua Flora.  The lavender has a lovely light scent, more sweet than medicinal.  (Frankly I love medicine-y lavender and I like it strong!  But this will be nice for the kitchen or bathroom.)  Fresh-Picked Herbs hasn't been opened yet and used on my hands, but a whiff of the bottle is pleasant and green, with a mostly mint vibe.  I haven't even opened the Bella Flora yet.

However, I also bought myself (not pictured!) a 10 fl. oz bottle of Sweet Cinnamon Pumpkin shower gel, along with an 8-fl.oz body splash spray in the same scent.  Strangely enough, the two present so differently!  The shower gel is spicy and pumpkininny (thanks, Mr. Show!), whereas the splash doesn't seem to have as much pumpkin power.  There's definitely cinnamon and vanilla-like sweetness, almost like an apple pie, but also I detect a deep musky note as well.  It's not a bad fragrance at all.  The sillage is good and few sprays lasts a nice long time.  I like putting it in my hair and a halo of fragrance all around me for hours!  The best part was the price: The full-sized shower gel was a measly $4.75 on clearance, and the big bottle of scent was just $5.25.  I guess this is because it's last year's fall lineup, but it's great to enjoy such a fab scent in the middle of summer -- and dreaming of those pumpkin picking days to come! :)  So if you're a pumpkin lover like me, get thee to the Bath & Body Works website and grab some pumpkin goodness! :)

Also, I want to mention that the lining of the B&BW shipping box was super cute.  So of course, being the box-hoarder that I am, I couldn't just toss it.  I HAD to use it, because hey, free box!  Instead, I have turned it inside out and taped the box back together, so now it's gracing my bedroom bookshelf in all of its gingham glory:


I may try placing it on a shorter shelf so that it's more like a drawer type thing instead of just a pretty box.  In fact, I'm enjoying the box so much that I might just wait 'til fall and buy some more B&BW to share with Dax (or purchase early for Christmas!) and see if they have a sexy fall-themed box liner for me to enjoy heartily. :)


Saturday, December 15, 2012

Picadillo Time!

Well, it's been a few months... and I've done a few things that I've wanted to post sooooo badly!  But for some reason, I've been kind of lethargic about that stuff.  I think the relocation just hit me harder than I realized it would!

But, after weeks of being like "Oh, this would be such a fun thing to post on PGS!" today I was like, "Screw this, even my humble dinner recipe HAS to be posted!"  So today, since a bad cold has been kicking my social circle in the ass all week long, my friend Fluffy and I decided to make some yummy spicy picadillo for dinner.  Fluffy and I shared the picture-taking duties.  Here's my recipe, and no, it's not really authentic at all.  But it IS inexpensive, forgiving, great for when you have (or need) lots of leftovers, and aside from the ridiculous amount of sodium, can be quite nourishing and yummy.

INGREDIENTS:

Solids:
* 1 lb ground beef (preferably quite lean, 'cause draining it is a pain in the ass)
* 1 lb ground turkey
* 1 10-oz package of Morningstar Farms "Grillers" crumbles (or your fave equivalent)
* 2 huge-ass chopped red, white, or yellow onions
* 1 red and/ or green bell pepper (use half of each, or one whole one of each if you love peppers... you could even go crazy and add a couple of jalapenos or banana peppers)
* 1/2 cup diced celery with chopped-up leaves for flavor
* a few tablespoons of capers
* 1 1/2 whole kosher dill pickle, or 1/2 cup olive style of your choice (I want olives, but Abil {A Boy I Like} has a psychic allergy to them, so pickles it is!)

Liquids:
* 1/2 cup wine; marsala is recommended
* EITHER the small can of tomato paste (how many ounces is that? 6?) or a 14-ounce can of chopped tomatoes
* water
* A splash of red wine vinegar or pickle juice -- hell, use both like I do!

Spices:
* 1/2 teaspoon crushed dried rosemary
* 1 tablespoon dried garlic or garlic powder (use to taste; I like a lot)
* anywhere between 1 and 5 bay leaves; use your favorite number.
* a big pinch of allspice & a big pinch of clove (optional but yummy)
* 1 1/2 tablespoons cumin
* 1 tablespoon paprika
* 1/2 teaspoon black pepper
* 1/2 teaspoon chili powder
* 1 teaspoon hot red pepper flakes (use to taste)
* 1/2 teaspoon oregano, thyme, or basil
* Optional: a few drops (or gallons) of Frank's hot sauce!
* Also optional:  A packet of Sazón Goya, for that delicious hit of MSG.  I would avoid adding any additional salt, as the pickled stuff and cooking wine has plenty.

Gases:
Not 'til later! ;)


Step 1.  Chop that onion and celery, get it sweating over the stove!  Use some olive oil if you have it, or just a bit of cooking spray.  Medium or low heat should do it.  Cook until the onion is see-through-ish and/or brown. 

Step 2.  Dice your peppers, process your pickles (either digital or analog methods will work fine), and get your spices ready while you wait for the onions to be translucent. 


Step 3.  Toss all that shit -- your peppers, your spices (except the Goya, the bay leaves, and the Frank's) -- into the pot!  It's better to put your spices in while the veggies are cooking so that they get coated with delicious seasonings right away. 

Step 4.  Add your tomatoes and/or paste, swirl it around until it's evenly mixed.

Step 5.  Add meat, breaking it up into luscious chunks.  Turn up the heat if you need to.  If you want a vegan recipe for picadillo, you can always substitute your favorite meat analogue for the turkey and beef as well; nothing else in this recipe is animal-based.  I have tried it both ways, and it's awesome no matter what protein you like.

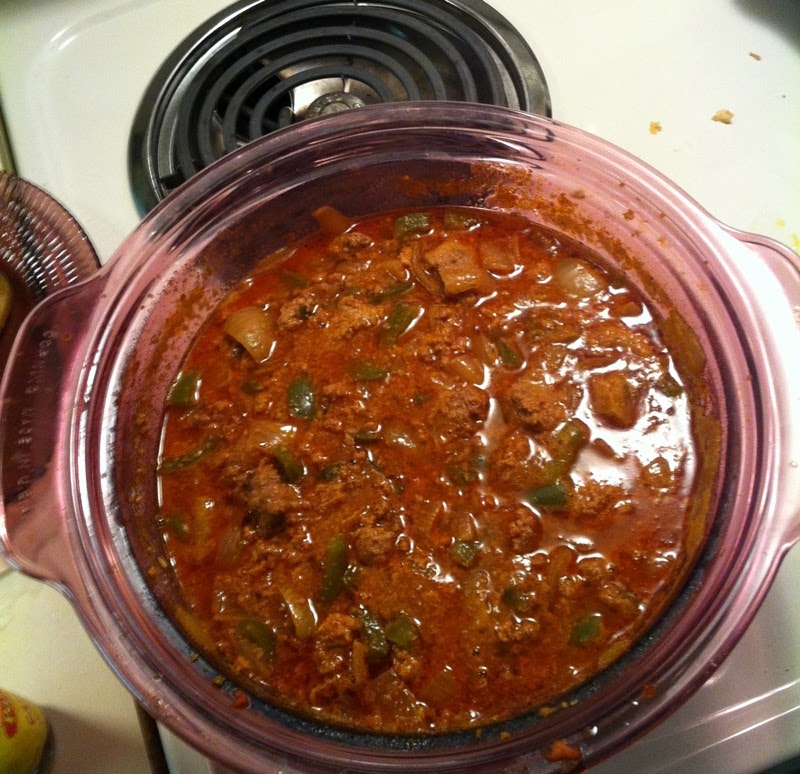
Step 6.  Here is where you add everything else: the wine, the vinegar, the "Grillers," capers, pickle, bay leaves, Sazón if you choose to use it, and just a bit of hot sauce -- you can adjust the heat later.  Stir everything up until it is mixed well, then add plenty of water.  Ideally, you want the entire mess to be completely covered and then some.  (This picture was taken after about 45 minutes of simmering, so keep that in mind.)  At this point, get the heat to medium-high, and then turn it to low after it has begun to boil.  Stir it now and again as it simmers, making extra sure to scrape the crap at the bottom of the pot so it doesn't stick and burn.  No one likes a ruined picadillo, except maybe your pet rats, but they really shouldn't be eating onions or garlic.

Here it is, bubbling frantically on the back burner!  It's almost done after about an hour...  Keep stirring and waiting.  I bet your kitchen smells awesome right about now!  Reminisce with your friends about how, years ago, this would be right around the time you'd be getting ready to go out clubbing... and then you eventually had other things consuming you, like arthritic hips and finding ways to pay for your Geritol addiction.  Ahh, memories!

And now, approximately an hour and a half after adding the water and crying over your lost youth, the picadillo has come to the perfect consistency: The liquid has reduced beautifully and everything has come together perfectly, so now it's almost the consistency of chili or a dense meat sauce.  There will still be some yummy liquid floating around in there, but it's fine and delicious.


 DONE!  Serve over rice and enjoy it!  (Also, marvel over how your new iPhone makes everything look 109482983958 times nicer than the crap-ass old cell you used to take kitchen pics with... wow!)

Wednesday, May 23, 2012

The Fine and Illustrious Art of Using Shit Up

Well, I'm still looking for a new pad.  Last week, I checked out a pretty good one (another Mecca of Coolness), but I'll discuss that in another entry.  Right now, my biggest issue revolves around the fact that I have about 2 months to declutter and get rid of as much crap as humanly possible.  I'm going from a 3-bedroom house, complete with basement and shitloads of hidey-holes, to a yet-to-be-named apartment where space and storage are all still unknown factors.  I am positive that I'll need to reduce my possessions by at least half -- no easy feat in any case!

One of my new ways of doing this has been referred to as The Fine and Illustrious Art of Using Shit Up.  In little ways, I am lightening my load -- eating all of my exotic stuff from the Asian grocery, using up my most treasured incense, bathing luxuriously in as much Lush as I feel like, giving away beautiful and useful things that I know will make my friends (as well as various charities) happy.  So, even when I don't have the strength to sift through boxes and bags and closets of junk, I'm still doing my part each day, little by little, lightening the load and clearing up the tiniest bit of space for my future move.

These days, I've been consistently reminding myself of an anecdote in Amy Tan's book (not The Joy Luck Club... the other book).  The narrator had an elderly aunt who was known to be rather stingy.  During each year at Christmas, her family would send Auntie a beautiful box of fancy chocolates.  One Christmas, they received a box of the same type of chocolate from her as well, and wouldn't you know it?  The chocolate was all white, dried out, and generally nasty.  It turns out that Auntie wouldn't enjoy the nice gifts that she was given; instead, she'd stuff the boxes of chocolate into her closet, saving them to regift.  Unfortunately, by the time an occasion was good enough to merit the chocolate as a gift, the candy had turned all gross and rancid -- not a very good gift at all!  So, not only did Auntie wind up giving her beloved relatives a big box of crap, she was also being very stingy with herself too.  The chocolates were saved because they were so special, yet no one got to enjoy them.  What a waste!  It also begs the question of why Auntie didn't think that she was worthy of such a nice prezzie, when obviously her family wanter her to savor the fancy chocolate?

The same concept can be applied to so many things that we're saving for a special occasion.  Instead of holding onto that expensive perfume you have, why not luxuriate in it instead -- before it turns into rancid crap that's worse than dollar-store body spray!?  Those fancy guest soaps that you've had on display since the 1990s?  They aren't impressing anybody anymore, so if they're now too gross to use, how about putting them to good use making your own laundry detergent?  These things take up our space, and somehow remind us that "today" isn't special enough, or maybe that we're not special enough, to just go all-out and enjoy whatever it is we're saving.  Use it up!  You'll be able to enjoy it while it's still good, and you'll be decluttering at the same time.

Saturday, April 14, 2012

What to Do With Leftover Roses & Petals

My birthday was this week, and a friend gave me a dozen stunning red roses that morning.  They looked gorgeous and smelled divine, but after a few days, I wondered (as I often do) how I can utilize them in the best possible way.

Some people say that if you want to preserve them, you can hang them upside down to preserve the color while they dry.  I've tried that before.  While the color of the petals does fade into a more dead-looking color, it's usually a deep pretty brownish-purple.  However, the leaves all stuck right up and looked stupid whenever I did it.  So next time I decide to try that, I'll figure out a way to keep those leaves from looking like they got stuck in an electrical socket.

One of my favorite things to do with roses is to make homemade potpourri, and of course, I love using my homemade incense recipe.   But this time... I have a few other tricks up my sleeves, so keep coming back and checking up on my developments. ;)

With this batch so far, I've begun preparing the roses for use in crafts.  First, I took off the rubber bands and saved them for another use.  Floral rubber bands are awesome, by the way; they're very strong, and usually you get a couple of different sizes in each bouquet.

My next step was to separate the roses from their petals.  I put the petals of eleven roses into my metal mixing bowl, and pressed the petals from the twelfth rose into the pages of an absolutely terrible hardback book (Here Kitty Kitty by Jardine Libaire).  Some of the random leaves were pressed into Make Your Own Luck: 12 Practical Steps to Taking Smarter Risks in Business.

I'm going to be washing the petals in the bowl.  They need to be as clean as possible for a cooking project that I'll be doing.  And the stuff in the book will probably be used to accent something that I want to frame, so we'll see how it goes!

Sunday, March 25, 2012

The Sweet Smell of... Failure

Here's a DIY idea that I am unlikely to repeat: making my own body spray.  Actually, I probably will try to make it again, but I'll remember the lessons I've learned from this batch.

My ingredients were simple: some denatured alcohol (rubbing alcohol from my local CVS) and the remaining bit of my half-ounce "Blue Nile" body oil... I'd say about a quarter- to a third- ounce was still left.  My container was a clean 2-ounce spray bottle which used to be a rose-scented body mist.  (The bottle was from Hot Topic and had an Amy Brown fairy on it, which was cute -- but boy, that body spray was nast-ay!)  You could try this on your own with any clean spray bottle, if you don't mind getting the kind of result that I did!

The "process" -- and I use the term loosely -- was simple: pour the Blue Nile into the empty 2-ounce bottle, then fill the rest of the way with alcohol and shake well.  I was pretty amazed at how nicely the two combined.  If any of you used to make "potions" as a kid, or used way too much of your mother's perfume & tried adding water to conceal the evidence of your pilfering -- well, you'll know how easy it is to make the mixture cloudy, gross, and generally unappealing.  I have learned a lot about perfumery since then, but nevertheless it excites me to see how beautifully the alcohol and oil can blend.

While the bottle was aesthetically pleasing, in no small part due to the pretty coloring of the Blue Nile perfume oil, the smell was... ehhhhh.  I would spray it on in the morning, but it would take some time for the alcohol to dissipate and the Blue Nile to become the predominant scent.  Someone hugged me an hour after I spritzed myself and declared, "You smell like booze!"  Well, that pretty much ended my perfume-making hobby before it began. :)

I would up diluting my leftover Blue Nile body mist with some water (and yeah, it became the awesome cloudy mix we all know and love) and used as linen water to scent my hand-washables during the rinse phase.  It worked quite well, and I was glad to find an alternate use for it.

Now I have two-thirds of a bottle of rubbing alcohol that I need to think up uses for.  Any ideas?

Saturday, February 11, 2012

99 DIY Lifestyle Skills

Being a do-it-myself kinda gal, I have to say that this post at over at TLC intrigued me.  I went through the list, sort of halfway nodding my head, and then I realized that there are a lot of things on the list that I can work toward, either now or after I've relocated.  Feel free to check and see how you're doing.  I'd also love to hear more unlisted skills that those reading this deem to be valuable.

My personal grading scale: 0 - not doing this, or it doesn't apply to me, .5 - I know how to do this and have been working on doing better, 1 - this is a regular part of my life.

Essential Food Skills
1. Read and understand product labels 1
2. Bake bread 1
3. Make your own bread starter and keep it going .5 (I don't consume a lot of bread)
4. Make cheese, yogurt, and kefir from local milk .5 (I can do all but kefir)
5. Preserve food by canning 0 (scary!)
6. Preserve food by drying .5
7. Forage for local wild foods safely 0
8. Raise a couple of backyard chickens 0 (I wish I had the room!) 
9. Make your own tofu,tempeh, and soy milk .5
10. Eat locally and in season 1
11. Grind your own flour .5 (I've done it)
12. Grow your own produce 0
13.Grow your own herbs 1
16. Have a repertoire of vegetarian recipes you can use for various occasions 1
17. Fish or hunt responsibly if you eat meat 1 (I don't hunt, but I know the basics.)
18. Make homemade pastas and other pantry basics  .5
19. Cook a variety of foods well 1
20. Utilize a menu to minimize food waste 1
21. Throw a party without compromising your green values 1
23. Sharpen kitchen knives so they last 1
24. Make homemade granola bars, granola, waffles, and other breakfast items 1
25. Make baked goods from "scratch". 1
26. Understand terms like, "organic", "Fair Trade", "all natural", and "GMO" 1

Essential Household Skills 
27. Sew well enough to repair clothing 1
28. Sew well enough to make your own clothing and reusable shopping bags 1 (not all of my clothing is handmade, but several pieces are, as well as my storage.)
29. Sew fitted cloth diapers for your baby 1 (do bunny needs count?)
31. Know how to reupholster a chair .5 (I know how to, and have done it - just not WELL.) 
32. Make your ownlaundry soap 1
34. Make your own house cleaning supplies .5
35. Use diatomaceous earth, bay leaves, and other "eco-friendly" natural pest deterrents 1

Home Maintenance and Repair Skills 
36. Use non-electric appliances rather than electric 1
38. Program a thermostat .5
40. Use 0 VOC paint 1
43. Make simple appliance repairs such as replacing belts 0
44. Find what you need by bartering, or using CraigsList, eBay, and thrift stores 1
45. Repair a leaky toilet 0
46. Repair a leaky faucet 0
48. Check your home for energy leaks using incense, a candle, or a device that is created for that purpose 1
50. Insulate an attic with eco-friendly insulation 1

Gardening Skills 
52. Use compost to enrich your soil .5
53. Plan a garden for your climate .5
54. Understand xeriscaping 1 (kinda)
55. Plant a multi-seasonal vegetable garden 0 (no room! wahw!)
56. Build a simple cold frame for salad all year 0
59. Use a manual reel mower 0
60. Use companion planting methods to control pests 0
61.Build a bat house to encourage bats and decrease mosquitoes .5 (soooo want to do this!)
62. Use predator insects like Praying Mantis to control garden pests 0
63. Know what heirloom seeds are and why you should use them 1
64. How to plant open pollinated vegetables for best yields 1
65. How to save seeds from your own produce 1
66. Plant trees and bushes to cut your energy bills 0 
67. Use soaker hoses to conserve water 0
68. Sharpen and maintain tools 1

Health Skills 
69. Know how to use herbs and natural remedies to treat common illnesses 1
72. Use essential oils for health and cleaning 1

Transportation Skills 
75. Do simple maintenance on your car  0
76. Arrange or locate a carpool 0
77. Learn to use hypermiling techniques 0


Energy Skills 
80. Install a solar panel 0
81. Know where to find the most eco-friendly, green power source available to you 1
82. Connect home electronics to power strips for easy shut off 1

Conservation Skills 
85. Use email rather than conventional mail 1
86. Switch to a paperless office .75 (I am soooooo close!)
87. Locate the local library and use it rather than buying books, DVDs, and tapes 1
88. Adjust your settings on the computer to make it more energy efficient 1
89. Use skype and other technology to limit the need for travel to conferences 1
90. Learn to plan eco-friendly vacations, such as camping (and leave no trace) 
91. Replace a hobby with an environmentally friendly hobby 1
92. Locate and use recreational green spaces such as hiking trails, parks, and public gardens .5
93. Understand and be able to explain what cradle to cradle means 1
94. Understand and be able to explain what carbon emissions are 1
95. Understand and be able to calculate a carbon footprint as well as explain what it is 1
96. Know where to recycle technological items like computers, microwaves, televisions etc. 1
98. Know where reusable items can be substituted for disposables 1
99. Understand and be able to explain cap-and-trade 1


My final score = 68.25%
Hmmm, that's a "D."  To be fair, a lot of it is stuff I can't help (like keeping chickens or installing solar panels, as I'm not a homeowner).  But I should try harder on the stuff that I can change!  Still, that was pretty interesting.  I'll have to see how I can streamline things a bit.

Sunday, April 5, 2009

No-Sew Sachet for Lazy People


If you’re like me, you absolutely hate to throw anything away.


I believe that clutter can really bring down a person’s positive energy, so I try very hard to work through my packrat tendencies. I have been in a decluttering phase that’s lasted… oh, about half of my life now! I figure that if I absolutely must hang onto certain things, I’d better make sure that they can serve a functional purpose. Hence, my mission to reincarnate old things into new, awesome, functional stuff! Unlike a lot of crafty folks who seem to have infinite patience and dexterity, I’m more interested in instant gratification. In my opinion, the best projects (a) produce objects that are functional, rather than frivolous, (b) can be completed in the space of one afternoon, or even a few minutes, and (a) won’t clutter up my house too much during its creation, or after it’s finished and ready to enjoy!


It is with this spirit in mind that I share my very humble instructions for a sachet that requires no sewing.

Easiest Sachet Ever:

INGREDIENTS:

1 pretty, but mateless, sock
1-2 handfuls of scented stuff – try potpourri, pieces of leftover scented candles, or extra fabric scraps treated with your favorite essential oil
string, yarn, thread, or ribbon (even rubber bands, in a pinch!) — or just use leftover sock pieces


Trim the cuff and everything below the heel off of your sock. This sachet can be made with the heel/toe section, but I like to work with the ankle. Tie off one end with your string/ribbon/etc., and add the scented stuff (I used a handful of leftover junk from my old Frebreze Scentstories discs!). Tie off the top, trimming your sock ends as needed.

Sachets are wonderful for adding a nice little burst of scent to closets and drawers. You don’t need to spend piles of money on fancy little trimmings, but do make sure that you choose a scent that you love and that has some staying power. The simple construction of this type of sachet will enable you to change the scent when it becomes necessary.

I usually keep the leftover cuffs to use as hair elastics, because even those “ouchless” elastics are sometimes murder on my extremely delicate hair. Leftover cuffs are perfect because they’re gentle, and ready-made in colors to match most of my wardrobe. And hey, free hair accessory… one that I don’t worry about losing or breaking!

A word of caution here: DON'T make the same mistake I did, and use a "fuzzy" sock (pictured). If you do, as I have, you will need put in a few stitches to contain any stray sock fuzz. Or you can fold over the ends of the sock to create a finished hem before adding the rubber bands/elastics. These socks were a hostess gift from a lovely relative who stayed with us last fall. I fell in love with those adorable little crocheted flowers, and when the elastic began wearing out, I knew that I’d have to give them a new life!


Related Posts Plugin for WordPress, Blogger...