Showing posts with label healthy. Show all posts

Sunday, September 1, 2013

Review: ZonePerfect Greek Yogurt Bar

I received a nice little treat in my Influenster VoxBox: a raspberry Greek Yogurt bar from ZonePerfect.

Now, one thing you may or may not know is that I love me some bars!  My favorite is Balance Bar, but I've tried zillions of others... Luna, Clif, Power Crunch, Nutrisystem, Pure Protein, Lara, SoyJoy, PopCulture Probiotics... The list goes on, but let's stop there.  I'm only adding these so that you know I know a thing or two about bars!

I tend to use them as more of meal component than as a snack, but when I tried this one, it wasn't even close to meal time.  I decided to give it a whirl. ;)

What hit me first was the almost perfume-like raspberry aroma.  The yogurt coating seemed consistent with "yogurt coating" that is often seen in snack foods.  It was tasty enough,  it the inner raspberry crunches were really delectable.  There was a slightly vitaminy flavor and a hint of graininess in the crispness and sweetness of the ZonePerfect raspberry Greek yogurt bar, but hey -- if you want something purely decadent, go eat a candy bar and be quiet. ;). Most nutritional bars will have these characteristics, and to me it's not unpleasant at all... Just a fact of life. :)

My one gripe is that at 13g of sugar, this bar might be a little on the high side.  But if you have the wiggle room in your sugar allotment, go for it.  This bar can go all of the places that Greek yogurt can't go, like a crowded bus on a warm day. Or into your backpack until further notice.  Gotta love that!

Grade: B+

[NOTE: Reviewer was given a complimentary sample of this product but was otherwise not compensated in any way.]

Monday, July 1, 2013

Soy-Free, Gluten-Free, Vegan Fake Meat! (Part 1)

Behold: "I Can Believe It's Not Meat, But What the Hell, I'll Still Eat It!"
Living with a vegan can be a difficult thing when you love meat and dairy.  I don't think I could stand giving up things like chocolate, sushi (with fish, not just veg), and cheese.  Poultry would be a tough thing to quit, as well.  My nutritionist agrees that, because of my special dietary requirements, I should not have to give these things up as my need for protein trumps my desire to have less animal products in my diet.  As I always say, if it's something that you need to do... you need to do it! ;)

However, that doesn't mean that I'm not a good flexitarian.  Lately I've been taking to making a "universal" meal for the household that everyone can eat -- it's gluten free, soy free, and vegan -- but then we include extra add-ons in our own individual plates.  It is working out so far!

By the way, last week I watched my first episode of "Dr. Oz" ever, and he said that 20% of the world has trouble digesting gluten!  Ahhh, delicious gluten.  I don't know if I'm in that group or not, but due to my household's needs, the "universal" method seems to be working fine.  I use the vegan food as my side dish, and usually add a big ole hunk of soy or animal flesh to my portion.  Fuzz will eat the vegan food and possibly add extra carbs (which I can't have), such as potatoes or rice with his portion.

Doesn't that look similar to a big plate of nasty raw meat?
I have found several "vegan meat alternatives" online, and here's one that I Frankensteined together based on a number of different recipes.  It looks like ground beef, and is perfect for adding into things like pasta sauce, tacos, chili, shepherd's pie, and other things that require some tasty ground beef-like vibes.  This is a good one if you like that slow-roasted flavor, and if you're fortunate enough to have a gas oven (I'm not), I bet you'll love it even more!


Ingredients:
1 head of cauliflower, trimmed and cut into florets
1 3/4 cups of walnuts
about half a can of beets, drained and chopped
5 ounces of raw mushrooms
1-2 Roma tomatoes, chopped
2 tablespoons balsamic vinegar
Here's ours after about half an hour.  1 more hour to go!
2 tablespoons olive oil
1 teaspoon granulated garlic
1 teaspoon liquid smoke
1/2 teaspoon of your favorite seasoning salt
2 pinches of sage
(Optional: 2-4 tablespoons of rice protein powder to amp up your protein!)

Preheat your oven to 400*.  Chop up your cauliflower and blend it in the food processor until it's very fine in consistency.  Next, chop your mushrooms, tomatoes, and beet.  Add them along with all of your other ingredients into the food processor, and give them a good whirl!  Mix everything together in a big bowl and knead it just like you would with a meat loaf.

Take one big cookie sheet, or in our case, two baking dishes, and fill them up with "meat."  Pop them in the oven and find a way to stay busy while these things cook.  They're going to need somewhere between 45 minutes and an hour and a half to get nice and dark and well-cooked!

Not bad at all! :)
You'll know it's done when it's a darker color, resembling ground meat.  Keep in mind that these crumbles are very loose; ours were not clumpy in any way -- I think they would be awesome if they were more clumpy for things like tacos or whatever, but I was still happy with the loose fine texture.  Pair with your favorite gluten-free pasta & vegan sauce, and you have a dinner that will evoke those good old non-restrictive food days!

Saturday, December 15, 2012

Picadillo Time!

Well, it's been a few months... and I've done a few things that I've wanted to post sooooo badly!  But for some reason, I've been kind of lethargic about that stuff.  I think the relocation just hit me harder than I realized it would!

But, after weeks of being like "Oh, this would be such a fun thing to post on PGS!" today I was like, "Screw this, even my humble dinner recipe HAS to be posted!"  So today, since a bad cold has been kicking my social circle in the ass all week long, my friend Fluffy and I decided to make some yummy spicy picadillo for dinner.  Fluffy and I shared the picture-taking duties.  Here's my recipe, and no, it's not really authentic at all.  But it IS inexpensive, forgiving, great for when you have (or need) lots of leftovers, and aside from the ridiculous amount of sodium, can be quite nourishing and yummy.

INGREDIENTS:

Solids:
* 1 lb ground beef (preferably quite lean, 'cause draining it is a pain in the ass)
* 1 lb ground turkey
* 1 10-oz package of Morningstar Farms "Grillers" crumbles (or your fave equivalent)
* 2 huge-ass chopped red, white, or yellow onions
* 1 red and/ or green bell pepper (use half of each, or one whole one of each if you love peppers... you could even go crazy and add a couple of jalapenos or banana peppers)
* 1/2 cup diced celery with chopped-up leaves for flavor
* a few tablespoons of capers
* 1 1/2 whole kosher dill pickle, or 1/2 cup olive style of your choice (I want olives, but Abil {A Boy I Like} has a psychic allergy to them, so pickles it is!)

Liquids:
* 1/2 cup wine; marsala is recommended
* EITHER the small can of tomato paste (how many ounces is that? 6?) or a 14-ounce can of chopped tomatoes
* water
* A splash of red wine vinegar or pickle juice -- hell, use both like I do!

Spices:
* 1/2 teaspoon crushed dried rosemary
* 1 tablespoon dried garlic or garlic powder (use to taste; I like a lot)
* anywhere between 1 and 5 bay leaves; use your favorite number.
* a big pinch of allspice & a big pinch of clove (optional but yummy)
* 1 1/2 tablespoons cumin
* 1 tablespoon paprika
* 1/2 teaspoon black pepper
* 1/2 teaspoon chili powder
* 1 teaspoon hot red pepper flakes (use to taste)
* 1/2 teaspoon oregano, thyme, or basil
* Optional: a few drops (or gallons) of Frank's hot sauce!
* Also optional:  A packet of Sazón Goya, for that delicious hit of MSG.  I would avoid adding any additional salt, as the pickled stuff and cooking wine has plenty.

Gases:
Not 'til later! ;)


Step 1.  Chop that onion and celery, get it sweating over the stove!  Use some olive oil if you have it, or just a bit of cooking spray.  Medium or low heat should do it.  Cook until the onion is see-through-ish and/or brown. 

Step 2.  Dice your peppers, process your pickles (either digital or analog methods will work fine), and get your spices ready while you wait for the onions to be translucent. 


Step 3.  Toss all that shit -- your peppers, your spices (except the Goya, the bay leaves, and the Frank's) -- into the pot!  It's better to put your spices in while the veggies are cooking so that they get coated with delicious seasonings right away. 

Step 4.  Add your tomatoes and/or paste, swirl it around until it's evenly mixed.

Step 5.  Add meat, breaking it up into luscious chunks.  Turn up the heat if you need to.  If you want a vegan recipe for picadillo, you can always substitute your favorite meat analogue for the turkey and beef as well; nothing else in this recipe is animal-based.  I have tried it both ways, and it's awesome no matter what protein you like.

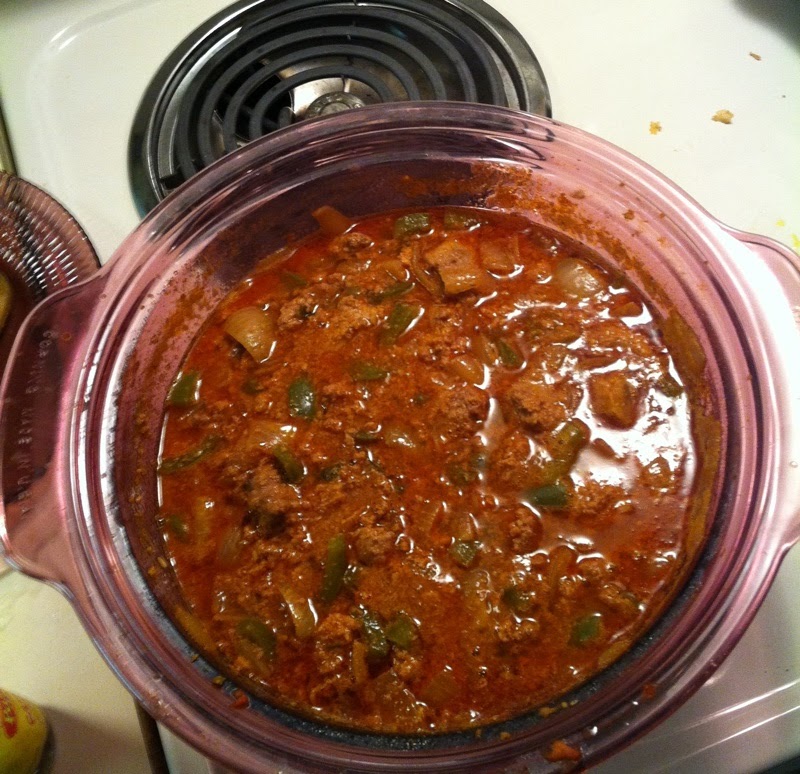
Step 6.  Here is where you add everything else: the wine, the vinegar, the "Grillers," capers, pickle, bay leaves, Sazón if you choose to use it, and just a bit of hot sauce -- you can adjust the heat later.  Stir everything up until it is mixed well, then add plenty of water.  Ideally, you want the entire mess to be completely covered and then some.  (This picture was taken after about 45 minutes of simmering, so keep that in mind.)  At this point, get the heat to medium-high, and then turn it to low after it has begun to boil.  Stir it now and again as it simmers, making extra sure to scrape the crap at the bottom of the pot so it doesn't stick and burn.  No one likes a ruined picadillo, except maybe your pet rats, but they really shouldn't be eating onions or garlic.

Here it is, bubbling frantically on the back burner!  It's almost done after about an hour...  Keep stirring and waiting.  I bet your kitchen smells awesome right about now!  Reminisce with your friends about how, years ago, this would be right around the time you'd be getting ready to go out clubbing... and then you eventually had other things consuming you, like arthritic hips and finding ways to pay for your Geritol addiction.  Ahh, memories!

And now, approximately an hour and a half after adding the water and crying over your lost youth, the picadillo has come to the perfect consistency: The liquid has reduced beautifully and everything has come together perfectly, so now it's almost the consistency of chili or a dense meat sauce.  There will still be some yummy liquid floating around in there, but it's fine and delicious.


 DONE!  Serve over rice and enjoy it!  (Also, marvel over how your new iPhone makes everything look 109482983958 times nicer than the crap-ass old cell you used to take kitchen pics with... wow!)

Wednesday, May 23, 2012

The Fine and Illustrious Art of Using Shit Up

Well, I'm still looking for a new pad.  Last week, I checked out a pretty good one (another Mecca of Coolness), but I'll discuss that in another entry.  Right now, my biggest issue revolves around the fact that I have about 2 months to declutter and get rid of as much crap as humanly possible.  I'm going from a 3-bedroom house, complete with basement and shitloads of hidey-holes, to a yet-to-be-named apartment where space and storage are all still unknown factors.  I am positive that I'll need to reduce my possessions by at least half -- no easy feat in any case!

One of my new ways of doing this has been referred to as The Fine and Illustrious Art of Using Shit Up.  In little ways, I am lightening my load -- eating all of my exotic stuff from the Asian grocery, using up my most treasured incense, bathing luxuriously in as much Lush as I feel like, giving away beautiful and useful things that I know will make my friends (as well as various charities) happy.  So, even when I don't have the strength to sift through boxes and bags and closets of junk, I'm still doing my part each day, little by little, lightening the load and clearing up the tiniest bit of space for my future move.

These days, I've been consistently reminding myself of an anecdote in Amy Tan's book (not The Joy Luck Club... the other book).  The narrator had an elderly aunt who was known to be rather stingy.  During each year at Christmas, her family would send Auntie a beautiful box of fancy chocolates.  One Christmas, they received a box of the same type of chocolate from her as well, and wouldn't you know it?  The chocolate was all white, dried out, and generally nasty.  It turns out that Auntie wouldn't enjoy the nice gifts that she was given; instead, she'd stuff the boxes of chocolate into her closet, saving them to regift.  Unfortunately, by the time an occasion was good enough to merit the chocolate as a gift, the candy had turned all gross and rancid -- not a very good gift at all!  So, not only did Auntie wind up giving her beloved relatives a big box of crap, she was also being very stingy with herself too.  The chocolates were saved because they were so special, yet no one got to enjoy them.  What a waste!  It also begs the question of why Auntie didn't think that she was worthy of such a nice prezzie, when obviously her family wanter her to savor the fancy chocolate?

The same concept can be applied to so many things that we're saving for a special occasion.  Instead of holding onto that expensive perfume you have, why not luxuriate in it instead -- before it turns into rancid crap that's worse than dollar-store body spray!?  Those fancy guest soaps that you've had on display since the 1990s?  They aren't impressing anybody anymore, so if they're now too gross to use, how about putting them to good use making your own laundry detergent?  These things take up our space, and somehow remind us that "today" isn't special enough, or maybe that we're not special enough, to just go all-out and enjoy whatever it is we're saving.  Use it up!  You'll be able to enjoy it while it's still good, and you'll be decluttering at the same time.

Saturday, April 7, 2012

Review: Kline Honey Bee Farm

Since spring came into bloom a few weeks ago, I had been having a pretty strong craving for something that I almost never have the opportunity to enjoy: raw honeycomb.  I love everything about it... the gem-like color and smooth consistency, the pretty hexagon shapes of the wax, the slow and sensual flow of the honey.  I also love that when I crave something sweet, a little bit of honey can scratch the itch long before the craving has me reaching for something less healthy.

The first time I ordered some honeycomb online was probably 2007 or so (from a company I don't even remember) and all I can really remember is how expensive the shipping costs were as most of them were sending them in heavy glass jars; so it was with trepidation that I checked the prices of eBay's honey farmers, and with annoyance that I noticed very little had changed -- the thought of having a bit of raw honeycomb seemed wonderful, but at $16 a pop plus another $8 for shipping seemed like just too much.

I decided to try Etsy; people sold honey-based beauty products and beeswax there, after all.  It was there that I discovered the Kline's Honey Bee Farm store on Etsy.  Kline's offerings were quite impressive -- honeycomb, pure standard honey of many types by the ounce or the gallon, even creamed honey and individual-serving-size honey sticks!  There were also blocks of pure beeswax and beeswax candles, honey soap and beeswax lotion.  It was clear to that these folks do honey, and they do it well, so after checking a few more places for price comparison and seeing that Kline's had them all beaten -- I placed my honeycomb order.


Less than a week later, I had a lovely package of honey in my mailbox!  It came through the mail just fine.  The honeycomb was in perfect condition.  Unlike some places where I've seen honey surrounding a tiny piece of honeycomb, this was a big generous slice of comb with all the little honey pockets perfectly intact.  It looked and smelled delightfully fresh, as if someone had gathered and packed it just for me. Beautiful!

My package even included a little sample of honey soap which smells a lot like Lush's "Honey, I Washed the Kids."  I was thrilled with every aspect of this purchase.  The honeycomb was a lovely and impressive addition to the dinner party I had.  I saved my beeswax, and there's enough to make a massage bar (or maybe two!).

Since I've been watching my carbs, I think my next purchase will be a batch of honey sticks.  They're portion-controlled and portable, so it seems like a great idea for the next time my sweet tooth hits me.  They even have honey in wacky flavors like root beer and pina colada!  I'll let you know how it goes!

P.S.  I borrowed this picture from Kline's store on Etsy.  Hope that's OK!

Saturday, February 11, 2012

99 DIY Lifestyle Skills

Being a do-it-myself kinda gal, I have to say that this post at over at TLC intrigued me.  I went through the list, sort of halfway nodding my head, and then I realized that there are a lot of things on the list that I can work toward, either now or after I've relocated.  Feel free to check and see how you're doing.  I'd also love to hear more unlisted skills that those reading this deem to be valuable.

My personal grading scale: 0 - not doing this, or it doesn't apply to me, .5 - I know how to do this and have been working on doing better, 1 - this is a regular part of my life.

Essential Food Skills
1. Read and understand product labels 1
2. Bake bread 1
3. Make your own bread starter and keep it going .5 (I don't consume a lot of bread)
4. Make cheese, yogurt, and kefir from local milk .5 (I can do all but kefir)
5. Preserve food by canning 0 (scary!)
6. Preserve food by drying .5
7. Forage for local wild foods safely 0
8. Raise a couple of backyard chickens 0 (I wish I had the room!) 
9. Make your own tofu,tempeh, and soy milk .5
10. Eat locally and in season 1
11. Grind your own flour .5 (I've done it)
12. Grow your own produce 0
13.Grow your own herbs 1
16. Have a repertoire of vegetarian recipes you can use for various occasions 1
17. Fish or hunt responsibly if you eat meat 1 (I don't hunt, but I know the basics.)
18. Make homemade pastas and other pantry basics  .5
19. Cook a variety of foods well 1
20. Utilize a menu to minimize food waste 1
21. Throw a party without compromising your green values 1
23. Sharpen kitchen knives so they last 1
24. Make homemade granola bars, granola, waffles, and other breakfast items 1
25. Make baked goods from "scratch". 1
26. Understand terms like, "organic", "Fair Trade", "all natural", and "GMO" 1

Essential Household Skills 
27. Sew well enough to repair clothing 1
28. Sew well enough to make your own clothing and reusable shopping bags 1 (not all of my clothing is handmade, but several pieces are, as well as my storage.)
29. Sew fitted cloth diapers for your baby 1 (do bunny needs count?)
31. Know how to reupholster a chair .5 (I know how to, and have done it - just not WELL.) 
32. Make your ownlaundry soap 1
34. Make your own house cleaning supplies .5
35. Use diatomaceous earth, bay leaves, and other "eco-friendly" natural pest deterrents 1

Home Maintenance and Repair Skills 
36. Use non-electric appliances rather than electric 1
38. Program a thermostat .5
40. Use 0 VOC paint 1
43. Make simple appliance repairs such as replacing belts 0
44. Find what you need by bartering, or using CraigsList, eBay, and thrift stores 1
45. Repair a leaky toilet 0
46. Repair a leaky faucet 0
48. Check your home for energy leaks using incense, a candle, or a device that is created for that purpose 1
50. Insulate an attic with eco-friendly insulation 1

Gardening Skills 
52. Use compost to enrich your soil .5
53. Plan a garden for your climate .5
54. Understand xeriscaping 1 (kinda)
55. Plant a multi-seasonal vegetable garden 0 (no room! wahw!)
56. Build a simple cold frame for salad all year 0
59. Use a manual reel mower 0
60. Use companion planting methods to control pests 0
61.Build a bat house to encourage bats and decrease mosquitoes .5 (soooo want to do this!)
62. Use predator insects like Praying Mantis to control garden pests 0
63. Know what heirloom seeds are and why you should use them 1
64. How to plant open pollinated vegetables for best yields 1
65. How to save seeds from your own produce 1
66. Plant trees and bushes to cut your energy bills 0 
67. Use soaker hoses to conserve water 0
68. Sharpen and maintain tools 1

Health Skills 
69. Know how to use herbs and natural remedies to treat common illnesses 1
72. Use essential oils for health and cleaning 1

Transportation Skills 
75. Do simple maintenance on your car  0
76. Arrange or locate a carpool 0
77. Learn to use hypermiling techniques 0


Energy Skills 
80. Install a solar panel 0
81. Know where to find the most eco-friendly, green power source available to you 1
82. Connect home electronics to power strips for easy shut off 1

Conservation Skills 
85. Use email rather than conventional mail 1
86. Switch to a paperless office .75 (I am soooooo close!)
87. Locate the local library and use it rather than buying books, DVDs, and tapes 1
88. Adjust your settings on the computer to make it more energy efficient 1
89. Use skype and other technology to limit the need for travel to conferences 1
90. Learn to plan eco-friendly vacations, such as camping (and leave no trace) 
91. Replace a hobby with an environmentally friendly hobby 1
92. Locate and use recreational green spaces such as hiking trails, parks, and public gardens .5
93. Understand and be able to explain what cradle to cradle means 1
94. Understand and be able to explain what carbon emissions are 1
95. Understand and be able to calculate a carbon footprint as well as explain what it is 1
96. Know where to recycle technological items like computers, microwaves, televisions etc. 1
98. Know where reusable items can be substituted for disposables 1
99. Understand and be able to explain cap-and-trade 1


My final score = 68.25%
Hmmm, that's a "D."  To be fair, a lot of it is stuff I can't help (like keeping chickens or installing solar panels, as I'm not a homeowner).  But I should try harder on the stuff that I can change!  Still, that was pretty interesting.  I'll have to see how I can streamline things a bit.

Tuesday, December 27, 2011

Love, Peace, & Chicken Legs

I'm not exactly sure how or why, but I recently came across this blog entry from Dine & Dish about baked chicken legs.  Somehow, the author has become obsessed with them to the point where she wants to eat them every day!

I showed Fuzz this article, and he was like "WTF is so special about baked chicken legs?"  And it's true; the ingredients are pretty simple -- just salt and pepper, a soupçon of olive oil, and the legs.  You basically pop them in the oven, and Bob's your uncle, baked chicken legs!  The commenters seemed to be singing the praises of these simple leggies to high heaven.  They were so fanatical about the glory and wonderousness that is baked chicken legs, that I had to try it and figure out what the deal was.  We made a half-batch for dinner soon afterward.

Well, I must say, dinner was rather unimpressive that night.  "Um, yeah, it's just chicken," Fuzz said, picking at his legs.  I wasn't quite as snobby about it as he was, and enjoyed it for what it was -- just some simple chicken, salt and pepper, a tiny bit of Frank's, no big whoop.  We packed up the excess legs, and within a day or two, I was requesting some of the leftovers for lunch and/or dinner.  Much to Fuzz's surprise, I enjoyed the hell outta those leftovers!

For the record, I don't consider these baked chicken legs to be quite as orgasmic as the enthusiastic commenters in each blog.  However, these sure were easy.  And the leftovers were just what a mobility-challenged gal like me needs on a high-pain-score day: plentiful, great without heating, and highly "grabbable."  What's more, a medium-sized chicken leg, sans frying or crazy sauces and condiments, is approximately about 70 calories or so (80-something if you absolutely have to eat the chicken skin).  So, even though I wouldn't call them God's gift to chicken legs, I would absolutely say that they're very tasty in their own right, convenient, and quite healthy too.  I'll be experimenting with some more seasoning techniques in the future, and will let you know how it goes!

P.S.  Apologies for the lame-ass clip art -- it was either clip art or nothing, and I didn't want to break my own anti-perfection rule!  Turns out that my Motorola Cliq has officially bitten the dust!  Fortunately, my replacement phone has been ordered, and should be arriving any day now.  So I'll be going back to some more regular posting in the near future, I'm sure. :)

Friday, January 28, 2011

Clean-Up Time

Fuzz and I don't typically make New Years' resolutions, per se, but since 2010 has brought so many changes to both of our lives, we've decided to stay on trend and continue making more changes  -- positive ones.  In the past few months, I have acquired a trash bag filled with undesireable objects for which I have no use -- a bunch of worn-out clothes, CDs of lame music, a coffee maker that was sitting inside a dirty mold-filled house -- and I've been meaning to get rid of these things for some time now.  I've also been in the process of purging other areas in the house to prepare for a major transition, so it seemed like a great idea to resolve to get rid of our extra shit.

Rather than do a full-on insane sweep of the house, I opted for an easier idea: We'll get rid of a few boxes each month, either until the end of the year or until our house is clean, whatever comes first.  Moving a heap of boxes is a hassle, though.  We've got a longstanding relationship with a number of non-profit organizations to whom we like to give extra money and items whenever we can.  Because our favorite donation organization, the Massachusetts Vietnam Veterans of America, doesn't do door-to-door pickup in our "new" local area, we opted for our other favorite charity, the Big Brother & Big Sister Foundation.  It turned out to be a fabulously successful undertaking... all we needed to do was fill out the form online, have our boxes on the porch for them on the day of the pickup, and Bob's your uncle -- the stuff's out of our lives, and ready to go into the lives of someone who wants them.  Best of all, it helps a wonderful organization to do great things!  Since the January pickup went over so well, I'm already thinking of what I want to donate next month.  I may just decide to tackle the ever-so-nasty Bedroom Closet O' Doom!

Here are a few tips to help you get started donating...

1.  The general rule of thumb is that if you haven't used an item within the past year, and you're not sure you'll be using it within the next year, get rid of it!

2.  Start small.  There's no need to purge every square inch of your living space right away; do it in small, manageable steps.  For example, choose a room -- or part of a room, such as getting all the drawers in one dresser -- and get that done first before moving onto another section of your space.

3.  As FlyLady says, "Never take out more than you can put back in one hour."  I know it's exciting to get things purged, but take your time and do it right.

4.  Schedule your pick-up or drop-off day well in advance so that you can work on the mess in small, manageable bits.  Even if your house looks like an episode of Hoarders exploded all over it, an emergency cleaning session is just gonna stress you out.  Take it slow and make the process as easy and stress-free as possible.  You did not accumulate the clutter in the space of one day, so you need not feel pressured to get it immaculate in one day, either.

5.  Don't let guilt or regrets weigh you down.  Just because you got something for free and/or got a good deal on it (or, worse yet, spent WAY too much on it) doesn't make you obligated to keep it.  Likewise with presents that just aren't "you."  If you don't love it, let it go -- maybe there's someone out there who needs and wants it.  Give those things a good home where they'll be appreciated and loved.

6.  Donate and recycle as much as you can.  It's good for the environment, the economy, and the soul. 

7.  Don't feel the need to put it off because you "haven't gotten it all done yet."  Do what you can, you can always schedule another pick-up, or find local thrift shops and make dropping things off a regular habit!


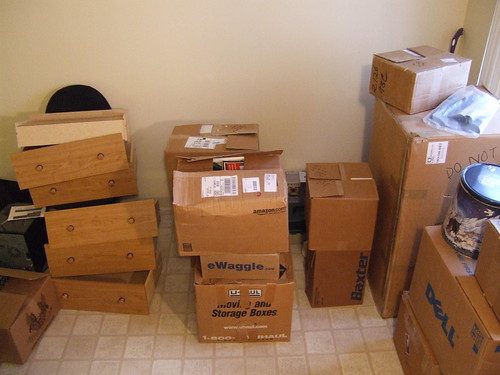
...And, in the interest of recycling and reusing, I have found these lovely pics on Flickr.  Thanks to the talented ed.ward for his awesome "messy room" photo, and the whimsical joebeone for the "moving boxes" pic!  I'm thrilled to give them credit in accordance with Creative Commons.  I do try to take my own pics when I can remember to do so, but I appreciate the sharing spirit of my fellow Flickr users.  Thanks!

Tuesday, January 25, 2011

It's Pumpkininny!

I roasted my final Fall '10 pumpkin this week.  Actually, I had 2 left, but one of them was totally rotten in the middle.  It was majorly nasty and oozy and black -- I should've thought to take a picture of it! One thing I *wanted* to do was save some of the orange hopefully-non-botulism-infested seeds to toast in the oven, as many frugalistas might try to salvage something that seems unsalvagable to people with a higher degree of sanity, but Fuzzband refused to allow any part of the offending item to remain in the house.  Amid my cries of "it's still good, it's still good!" he unceremoniously dumped the black mess into the trashcan and glowered whenever I dared approach!

Anyway, I was pleasantly surprised to see that after over 2 months, the other pumpkin that I got at the end of October was still fresh and in great eating condition (it was beginning to get just a teensy bit dry and stringy on the inside, but even my spouse could see that it was, indeed, "still good" for realz).  I roasted it to perfection, soft and sweet and slightly charred around the edges.  To celebrate, I decided *not* to bake a pumpkin pie, but instead of half-assedly throw together a tribute dessert that was much easier, lighter, and still evocative of my prime pumpkin days -- pumpkin pudding -- just one bite will have you dancin' around like Josh Fenderman!


PUMPKIN PUDDING

INGREDIENTS:
1 "small" package of instant pudding mix (vanilla will do nicely)
1 1/2 cups of milk
1 cup of cooked pumpkin, squash, or other orange-hued gourd, fresh, frozen or canned
1/2 to 1 teaspoon of cinnamon
2-3 pinches of nutmeg
1-2 pinches of cloves

Empty the pumpkin into a large bowl (and puree the living snot out of it with a hand mixer if you aren't using canned pumpkin). Add the milk slowly and continue mixing until about half the milk has been added.  Add pudding and spices, continuing to stir.  Then, slowly add the rest of the milk.

VARIATIONS AND NOTES (for those who are curious):  You could substitute butterscotch pudding for the vanilla, though I haven't tried that yet -- I'll also bet you can get awesome results subbing your favorite vegan mix and adding the pumpkin & spices to the final product.  Usually I make this with sugar free pudding mix and 1% milk; the "lighter" milks will make this come out a bit on the thin side, but it's still a very good substitute for pumpkin pie if you're feeling lazy. :)  I made a full-sugar version for a friend and poured it into a ready-made graham cracker crust... it made a pretty pie, though it was a bit softer than I'd've liked.  The lighter version with sugar-free pudding and 1% was served in a bowl without pie crust, and tasted pretty darn good by itself.  WARNING:  Don't use sweet potato in this; when it's whipped, it makes the pudding gluey and weirdly dense.  (Unless you like that sort of thing, of course.)

Thursday, September 30, 2010

Holy Shit! More on a Stick!

 
Turkey is another yummy thing to cook on skewers.  By marinating strips of meat in a spicy marinade, you can turn mild-tasting turkey into a delicious flavor-packed meal that's healthy, convenient, and impressive.  These are delicious right off the grill, or even chilled the next day.  


TURKEY CHOOCHACHEECHACHOO FOR A CROWD OF SCREAMING FANS!

INGREDIENTS:
1 entire turkey breast
1 package of McCormick "Zesty Herb" marinade mix
2 teaspoons of curry powder
1 teaspoon of turmeric
1/2 cup white vinegar
1 teaspoon of dried garlic OR 4 cloves of fresh chopped garlic
Hot sauce to taste (I insist you use Frank's; a goodly amount, but not so much that people think they are eating buffalo choochacheechachoo [though now that I think about it, that sounds pretty good too]!)


EQUIPMENT:
skewers
knife
1 gallon plastic bag

First, take the skin off of your turkey breast.  Then cut all of the delicious boob meat off of your turkey, trying to keep each half as intact as you can.   (You can save the bones and all the meat sticking onto those hard-to-reach places for soup stock; just toss it in the crockpot with a bit of veggies and your choice of spices, add some water, and... Bob's your uncle!  Yummy stock/broth in about 3-4 hours!)

Slice the turkey breast meat into strips and place into the plastic bag.  Add all the other ingredients and marinate 8 hours or overnight.  When it's time to cook the turkey, place the strips onto sticks and grill for about 20 minutes on a low heat, or until the turkey is done.  Sometimes I finish these off with a light glaze of apricot preserves and curry powder so they'll look pretty on a plate, but if that's not your thing, this is especially tasty with Awesome Sauce.


Thursday, September 16, 2010

Shit on a Stick Redux

In keeping with the spirit of my "Summer of Food on Sticks," I have decided to write a bonus article about some of the other things I've been putting on sticks lately.  It's not all about beef heart choochacheechachoo in this house. ;)

One of the healthiest, easiest, and tastiest "stuff on sticks" that I enjoy is frozen grape choochacheechachoo.  These are super easy, and so convenient when you need a snack. 

FROZEN GRAPE CHOOCHACHEECHACHOO

INGREDIENTS:
grapes (best if you have 2 or more colors)

EQUIPMENT:
skewers

All you need to do is wash your grapes well, and then place 9 grapes on each skewer.  If you have many different types of grapes, you can do some fun patterns, too!  Pop them into the freezer and keep them there overnight.  These look beautiful arranged in bunches on a platter or tray, but are also a wonderfully convenient fruit snack when you're craving something quick, sweet, and satisfying.  Kids love them too.
Related Posts Plugin for WordPress, Blogger...