Wednesday, November 19, 2014

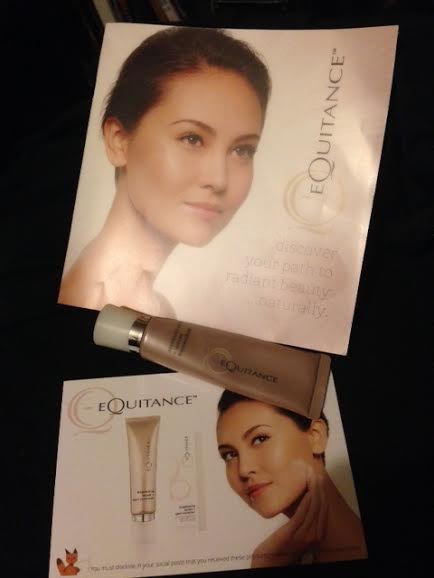
Review: Equitance Brightening Serum & Spot Corrector

I received this product through Influenster as a complimentary sample for testing purposes.  Used it for a few weeks now, and I have to say I'm pretty impressed with it!  The full-size tube gives you a lot of product, and only a little is needed.  I loved the light scent which was pleasant but not overly pefumey, and the fact that it was easily absorbed into the skin as opposed to just sitting there, drying out, and getting sticky.  I have a lot of redness and angry patches on my skin, so this was a nice product to try.

My tips on how to use this product:  Make sure that your face is really, really clean.  Don't use a moisturizer or something and then add the Equitance serum because otherwise it may not be absorbed as well -- which I figured out when trying to combine with my Boots calming serum.  Also, it seemed to me that exfoliating on a regular basis helped boost the effectiveness of the Equitance serum as well.  It's best to put this on overnight so that your skin can repair itself and show the nicest benefits possible.  Another quick tip:  I've heard some people say that the scent is a wee bit overwhelming at first.  You don't need much product to get results!  Try using a little less than you have been, and give the product time to be absorbed to the skin.  The scent will dissipate as the product is absorbed.  Personally, though, I like the fragrance. :)

Boogie on down to the Equitance website at Equitance-US.com and use their promo code, INFL15 to get a 15% discount on your brightening serum from Equitance!  You also get a free skin care kit full of fun trial products that compliment the serum very well.  Enjoy!

Saturday, July 26, 2014

Fresh Blueberry Cobbler for the Bakingly Challenged

A cozy home scene: Baked goods and skulls!
I once had a recipe for "mock cobbler" that rocked my damn world.  No idea where the hell it went, though.  Someday I'll find it again, maybe.

But this is a story about blueberries.  I am not a big blueberry fan, having eaten about 9 thousand tons of them one summer afternoon in my youth.  My older brother and I were afflicted with the worst attack of food poisoning that the planet had ever known.  Fortunately, our vomming urges seemed to be in perfect sync; first one of us would have to run to blow some blueberry chunks, and then a few minutes upon that kid's return, the other would begin to heave.  We gave one another reports on the color, amount, and consistency all afternoon until finally, the torturous barfing finally ended. 

But, I digress!  I recently came into about 3 pounds of blueberries that needed to be used up before going bad!  At first, my plan was to make a lovely pie or two, but bugs in the flour ruled out that option.  (Despite the bonus protein that the bugs provide, I've gotta draw the line somewhere.)  Here's a great recipe for blueberry cobbler that hopefully won't remind you of the above story.  I did find a box of bug-free Jiffy mix, so decided to make cobbler instead.  I divided the batch into two pie plates to make it seem more pie-y.  Why the hell not?

Hopefully, the recipe below won't remind you much of the Vomit-Fest story above.  If you visit me and I bake this for you, eat all you like -- I still have an aversion to blueberries!

INGREDIENTS:
3/4 cup of water
1 cup of flax milk
4 cups of blueberries
4 tablespoons of butter
3/4 cup of sugar
2 cups of Jiffy biscuit/baking mix
1/2 teaspoon of salt
1 teaspoon of cinnamon
1/4 teaspoon of ginger

Here it is, all raw and yummy. No canned pie filling required.   
DIRECTIONS:  This is super easy to make!  First, preheat your oven to 400 degrees.  Spray your cobbler dish (or use some pie plates like I did) and put your blueberries in the bottom, then sprinkle with spices.   In a separate bowl, mix the Jiffy, salt, and butter together until it's grainy and pea-like in consistency, then pour in the milk and continue to knead until the milk is thoroughly incorporated.  Crumble (or rip apart) the biscuit mixture, and then add dollops of it to the top of the berries.  Then, sprinkle the sugar over the biscuit blobs and berries.  Pour the cup of water over the whole thing, and pop into the oven for about 35 minutes.  (I turned my oven off and allowed the dishes to stay in there for a little while after.)

The recipe yielded a cobbler that was a bit runny, but still not bad.  The biscuit bits were surrounded with delicious berry syrup, and it wasn't too cinnamon-y for me.  Next time, I think I'll add my spices to the sugar, or at least sprinkle a little cinnamon on the top of the cobbler.  I may also mix the blobs and berries together next time, just to see if it makes a nicer variation in consistency.

Btw -- the original cobbler recipe can be found here on the Jiffy site.  I added my own twist to it, but the good news of it is that you can use pretty much any fruit that you've got, even mix it up, as long as you get to about 4 cups of fruit.  Pretty awesome, eh?

This dessert microwaves well the next day, too, by the way.


Friday, July 11, 2014

Review: Revlon Velet Touch Lipstick (Discontinued)

I apologize for not posting much lately.  My doctor has put me on a bizarre new eating regimen, so I haven't really been able to actually, y'know, cook food. So I haven't tried any awesome new recipes lately.

And now for the good news.  Earlier this year (in January, to be exact), a moratorium on buying stuff was put into effect.  Absolutely nothing was supposed to come into this house that wasn't absolutely essential.  But, now that the moratorium has lifted, I've decided to put all of this extra money that comes with not eating awesome food to good use:  by buying a bunch of crap that I've been dying to have.

Lately, I have been on a vintage lipstick kick.  Something in my brain has just been pushing me to long for the scents, the feels, and the colors of my youth.  It is in this spirit that I present a review of a vintage product which I've recently acquired through the magic of eBay: Revlon Velvet Touch lipstick!

Now when I was a mere slip of a girl in perhaps 8th or 9th grade, this shit was all the rage.  The commercial was so elegant, grown-up, and sophisticated... the one that I was remembering seemed to harken back to old-fashioned Hollywood glamour.  Unfortunately, all I could find on YouTube was the Cindy Crawford version which came out later.  I like the original better, though admittedly this slice of 1990s nostalgia makes wearing Velvet Touch lipstick look like a party in a tube!


The lipstick names all had sexy, sensuous, velvety sounding names.  With a lifelong fetish for velvet and a love of vintagey glamour, how could a youth like me resist that seductively colorful eye-popping display at the local smalltown Hills department store?  At the time, I was going through a zany "orange makeup" phase (blame it on my love of Halloween!), though the shade that I settled on was called "Cherry Crush," -- a deep blue-toned crimson which was perfect for that bloodred look that I craved.  Oh, how I loved it.  I bought others, too, later... which included a metallic coral shade that just barely fit in with my orange repertoire.

The feel of this lipstick was unlike anything I had previously experienced.  It truly did have a soft, velvety, long-wearing consistency with a slightly powdery feel and a highly pigmented finish.  The smell of this formula was distinctive, too.  I can't describe it -- it's a subtle powdery/perfumey/chemical scent that stuck in my mind for two decades after Velvet Touch had come and gone.  The color and staying power had earned Cherry Crush a place in the "active" section of my teenage lipstick collection (which was an impressive 3-digit array of all sorts of delectable shades!).

Recently, I was siezed with a longing to possess more Velvet Touch so that my lips could relive the experience.  I checked eBay, and to my surprise, there were some 20-year old tubes available for sale!  However, they were fairly expensive (at about $20 each).  I was able to find a smaller version for $7.95.  It's somewhere between a sample and full size.

The color is called Plum Velour.  Online, it seemed to much deeper and darker than it was in person.  In actuality, it's more of a magenta color.  In fact, when I opened the tube, the first thing I noticed was that it was the same color as my hair!  (Here's one with my hair so that you can see what I mean.)  And that smell!  It was exactly the same as it was back in the day -- miraculously, the lipstick hadn't gone bad or anything!  I was ecstatic that even 20 years later, the product is still so wearable!  Although this is touted as a "creme," the color does have a very slight shimmery finish.  It isn't glossy or sparkly per se, just has a nice bit of shimmer to the color, so that it still looks 90% matte with a 10% shine factor that seems to add a little more texture and velvet-y-ness to the product.  It is a fairly long-wearing formula, though I didn't attempt "6 velvety hours" in it just yet!  All in all, I have to give this product a good strong "A" for its awesomeness.

Can anyone recommend a style of lipstick that has a similar consistency or texture so that we can have a "dupe" of these classic colors?  Have a favorite vintage lipstick that you'd like me to find and review?  Comment below and maybe we can help each other!

Friday, April 25, 2014

Emergency Guacamole!


It only has 2 ingredients, and it looks pretty disgusting when it's done, but it scratches the guac itch!!

First, you need a ripe avocado and a bottle of Cholula chili-lime hot sauce. (OMG. I love it -- I could *drink* this stuff!!)

Mash the living hell out of the avocado and add as much sauce as you can stand!


When it's done, might look kinda brown. (If you care, add some cilantro, green onion, even parsley or tomatillos to even out the color.)

Close enough! :)

Tuesday, December 31, 2013

Making Cook and Serve Pudding in the Microwave

Yes, it can be done! My results may not be your results, though.

First, I whisked my milk and "cook & serve" pudding together. Then I placed it in a tall plastic container... It's important for your container to be tall! Otherwise, the pudding is going to overflow and it'll be all over the microwave.

My microwave is one of those spinny rotating ones.  I put the mixture in for 2 minutes on the microwave's normal setting, then brought it back out and whisked it really good. By this time it was very well blended, and had bubbled while cooking, but still remained very thin.

When I placed it back into the microwave this time, I did it for 3 minutes. After half the time, the pudding had risen to the top of the container, so I took it out and whisked away the lumps. This is a picture of what it looked like right after -- seems to work just fine! After it cools, I'm using it to make fruit dip for a party I'm attending tonight.

My advice is to watch that sucker, and whisk it good between nukes. Give it a try and let me know how it goes. :)

Wednesday, November 20, 2013

Lesser Carb Cheddar-Squash Casserole


One quarter of this ENTIRE recipe is under 500 calories for a great dinner in and of itself!  You can also eat a half serving (one eighth of the batch is about 240 cals) for a satisfying, cheesy side dish that is still packed with veggies.

INGREDIENTS:

*2 cans of cream of chicken soup
*1 4-oz can of green chiles
*20-oz bag of frozen squash
*Big bag of broccoli/cauli mix (can't remember the ounces, but I think my bag was about 4 cups of frozen veg.)
*2 cups of shredded cheddar cheese
*1/4 box of Dreamfields Spaghetti (I think that's about 3 ounces of dry pasta)
*whatever herbs and spices you like! (I used garlic and dill in mine.)

Preheat your oven to 350 and get your pasta water boiling.  Pour your chicken soup into the bowl.


Next, season that sucker!

I also added a little "hamburger seasoning salt" but next time I will figure somethjngn else out. Between the cheese and the chicken soup, you're looking at over 1K sodium for the dinner serving.

Mix things thoroughly and start adding squash.


Now, just when you think it cannot possibly look more like vomit, add your broccoli mix and half the cheese.


Add your pasta (which should be cooked according to directions -- you can shave off a minute or so, since this is going into the oven).  Add the remaining cheese.


Now it's ready to pop into the oven!  I baked mine uncovered for about 30 minutes, since I defrosted my veg first, and the only real thing was to let the cheese melt.  If you begin with frozen veggies, try cooking it covered for 30-45 minutes, then uncovered for another 15.


Eat and enjoy!  Relax... A big serving is 50 carbs (which isn't bad at all for a pasta meal), and a small serving is just 25 carbs!  If you use Dreamfields like I do, your net carbs will be even less.


Saturday, November 2, 2013

The Halloween After October

So, this year, I only carved ONE measly pumpkin!!! Boooooo!!! :(

The problem with pumpkins around here is that the big-ass mamas aren't sold after Halloween. Instead, for November, people have to make do with sugar pumpkins which are nice for making a little pie, but not so nice for making a BIG pie! Or carving BIG designs! Or roasting BIG amounts of seeds!! 

My mother got me a special pumpkin last month, and when I visited for her birthday, she presented me with "tumor pumpkin" or as I like to call him, Bumpkin. We got another at Aldi's and it's sitting here chillin'. So there are 2 more pumpkins to carve.

Update: My friend fluffy came over to hang out and eat lunch. He brought me more pumpkins! Yay! So now I have 4 big ones and a several small sugar pumpkins. Gonna roast some seeds tonight!


Tuesday, October 15, 2013

Review: LUSH Ickle Baby Bot Bath Bomb

Whoooo, this is a mouthful to say! Try doing it three times fast.


"Ickle Baby Bot" is a bath bomb which was designed with children in mind. Unlike many round bombs, this one has a cute robot shape.  The fragrance is a mixture of lavender, sandalwood, and chamomile which is meant to be soothing and wonderful for a nice relaxing soak.

The price of this bomb is about $4 in the USA, which makes it a bit more economical than some of the other LUSH products.  I love the scent and the cute blue robot theme! Don't let it's child-centric marketing devices cause you to miss out on a great product!

Saturday, October 12, 2013

L'Oreal Colour Rays Has Been Discontinued!

Oh, love of my hairdye life!  I'm so sad to see you go.

The "Colour Rays" line has been a staple in my hair coloring repertoire for so many years now.  I would just brush this stuff on and get the easiest root maintenance EVER.  There were no zillion steps to follow, no foiling, no worry that my hair was going to melt and fall out from bleaching, and that formerly mandatory "second step" of adding Manic Panic could be done when I was damned good and ready (or not at all, if I really didn't have the time).  Who can forget the ease and simple beauty of hues such as Red Rays, Way-Out White, and the crown gem of color awesomeness, Fuchsia Flash!  Touted as the one-step hairdye system which is "highly visible on even the darkest hair," L'Oreal Colour Rays has touched my life (and my roots) with easy, perfect, maintainable vibrancy since the mid-2000s. 

Even in the beginning, this miracle of cosmetic wizardry has been elusive and difficult to find; I used to have to import my stash from New Hampshire, and once that connection dried up, scouted the Internet for new sources.  Alas, so many of my bookmarked shops are no longer carrying it that I decided to do a quick bit of research to confirm that my deepest fears have indeed come true. 

Here's the official word from L'Oreal Paris in response to a Facebook user's query: "We are sorry to confirm that this line has been discontinued. We do not currently have a replacement product to achieve red or fuschia highlights, but our creative teams are hard at work coming up with new and exciting products. In the meantime, if ever you are interested in a full-head colour, we do offer some high-intensity red and violet shades in our Féria line (http://bit.ly/mRZqFs). For personalized advice and help with shade selection, please don’t hesitate to call our Colour Experts at 1.888.456.7325!"  This is a truly a harsh blow to my beauty regimen, especially since now that I've begun swimming, my hair color fades more easily than it used to.

From what I can see, this product is still available for purchase at the L'Oreal website and a few other places online as well. (I just bought two boxes from Amazon.) Better stock up while they last!

I will be exploring other brands and products, so watch this space for more details!

Fare thee well, Colour Rays, as you escape this mortal coil. Know that your admirers and well-wishers shall always carry a place for you in their hearts!


Friday, October 11, 2013

Breakfast Polenta Recipe

I freaking LOVE to eat polenta!  Usually, I eat it as it's in its mushy state... Instead of a heap of pasta or mashed potatoes, I'll opt for polenta to be the bottom against my sauce's meaty top. Heh heh.


Last week, I had a vegan dinner party and decided to use polenta as a crust for my cottage pie.  (It was yummy and I was lazy!).  I was left with about 2 cups of yummy corny awesomeness to use later.


The first thing that I did was to unmold it and consider my options.


Then I sliced it into pieces, added a little olive oil to a hot pan, and got to work! I think it was about 5 minutes before I needed to flip.


They started looking better!


Not all flipping was successful.


It really started to get awesome after a few minutes on the other side.  A cast-iron skillet is the way to go.


After a tiny sprinkling of salt, I was ready to eat! This was a very filling, happy, and satisfying breakfast that I can't wait to make again sometime.


 (Oops: here's the recipe! Take 2 cups of polenta {1/2 cup of cornmeal stirred into 2ish cups of boiling water; add seasonings of your choice}, pour it in a container & allow to chill overnight or longer, unmold, cut into strips, and cook with about a teaspoon or two of olive oil, high heat, about 5 minutes per side. You can flip again to lock in the polenta-y goodness, but that's optional. Dash with salt, serve, and eat!)

Wednesday, October 2, 2013

Keeping Those Monster Cereals Fresh!


I'm the type of person who loves Halloween.  I mean, loooooves it!!  (You can tell by all of the cool pumpkin and Halloween-related shit that I post here.)  When the the General Mills Monster Cereals became "restricted" to seasonal items only, I was super sad.  But, when it becomes available once again, I get very happy.

One thing that I do not looooove, though, is trying to reduce my carbs.  I have recently lost about 25 pounds, and I still have many more pounds ahead of me.  So, when the craving for something sweet hits me, cereal can often hit the spot (Count Chocula, I'm specifically looking in your direction!).

My biggest problem with all cereals is that, by the time they get to the end of the box, they're all stale and yucky and gross.  Plus, I hate cereal dust!  I've fixed this problem by biting the bullet & buying plastic "snack bags" for those days when I need to take my food with me.  They work great with cereal, too, for those times when plunging a hand into the cereal box and scarfing down who-knows-how-many grams of sugar just isn't going to cut it.

I am storing my single-serve "100 calorie packs" in the boxes that the cereal came in.  After these are done, I'll get some Frankenberry and maybe even some Fruit Brute!  These will ensure that my breakfast is fresh and spooky for weeks and weeks to come! :)

Sunday, September 1, 2013

Review: ZonePerfect Greek Yogurt Bar

I received a nice little treat in my Influenster VoxBox: a raspberry Greek Yogurt bar from ZonePerfect.

Now, one thing you may or may not know is that I love me some bars!  My favorite is Balance Bar, but I've tried zillions of others... Luna, Clif, Power Crunch, Nutrisystem, Pure Protein, Lara, SoyJoy, PopCulture Probiotics... The list goes on, but let's stop there.  I'm only adding these so that you know I know a thing or two about bars!

I tend to use them as more of meal component than as a snack, but when I tried this one, it wasn't even close to meal time.  I decided to give it a whirl. ;)

What hit me first was the almost perfume-like raspberry aroma.  The yogurt coating seemed consistent with "yogurt coating" that is often seen in snack foods.  It was tasty enough,  it the inner raspberry crunches were really delectable.  There was a slightly vitaminy flavor and a hint of graininess in the crispness and sweetness of the ZonePerfect raspberry Greek yogurt bar, but hey -- if you want something purely decadent, go eat a candy bar and be quiet. ;). Most nutritional bars will have these characteristics, and to me it's not unpleasant at all... Just a fact of life. :)

My one gripe is that at 13g of sugar, this bar might be a little on the high side.  But if you have the wiggle room in your sugar allotment, go for it.  This bar can go all of the places that Greek yogurt can't go, like a crowded bus on a warm day. Or into your backpack until further notice.  Gotta love that!

Grade: B+

[NOTE: Reviewer was given a complimentary sample of this product but was otherwise not compensated in any way.]

Saturday, August 31, 2013

Influenster's "Good Life" VoxBox

After hearing about people getting free products to blog about from Influenster, I have decided to give it a go!  Finally, I have qualified for a VoxBox.  This one is called "The Good Life VoxBox" and is filled with products that are dedicated to happiness and health. Since I'm always striving for improvements in both, I guess I've made the cut!  Let's take a look at what's in the box!

1.  New Skin liquid bandage.  I've long been a user of New Skin, because I hate bandages.  It's so convenient to just brush the liquid on and go. This new formula is a spray version!  I can't say that I'm exactly looking forward to the next time I get injured, but I am curious to see how this new spray version works in comparison to the brush-on kind.

2.  90-capsule bottle of Garcinia Cambogia supplement from The Vitamin Shoppe.  Looks like a 45-day supply.  This substance claims to have appetite suppressant properties.  Interesting. I'm not a diet pill user, but I know someone who is -- so they won't go to waste.

3.  Nonni's ThinAddictive Biscotti 100-calorie pack.  Never tried anything from this company but my package had plenty of crumbs and broken bits.  We shall see!

4.  ZonePerfect Greek Yogurt Bar.  This is right up my alley.  Can't wait to try it!

5.  Urgent RX Headache Powder.  Had no idea that "headache powders" were still officially a thing.  I do get headaches on a regular basis, so I'll keep this product at hand.

As instructed by Influenster, I'm to disclose that I received these complimentary items for review purposes.  However, I promise to be honest in all of my reviews! ;). Stay tuned for more!

Wednesday, August 28, 2013

Chicken Carcass Soup

Last night, I had a delightful rotisserie chicken! (Yay!) But, it was overcooked. (Boo!) It still tasted pretty good (yay!), but quite a bit of it was inedible due to the scorched parts (boo!). I decided to make some bean stew later this week (a la "Recipe for a Snowy Day")... Which is not only a great way to use up those blackened bones and dried-up meat and shrivelly chicken skin, but also a fab way to get the nasties out of the fridge as well!!

I started by picking all of the usable meat off the bones -- I'll eat that for dinner tonight -- and threw all the rest of the carcass into my trusty crockpot. Some of you might be aghast that I didn't toss that tasty browned skin -- but I never do! I always let the skin simmer with my broth, and after everything is strained and cooled, I just skim the fat from the top. It couldn't be easier, and the broth turns out virtually fat-free this way.  And even the littlest bit of extra flavor helps.

I also added the woody stalk pieces to some asparagus that's been staring me in the face a little too hard... (Because, again, it's all getting strained... Why not add what you can't eat?)

... As well as the green leafy ass-end of my beautiful cauliflower.  (Not pictured: the bug I found clinging onto a floret for dear life!)

Then, I grabbed the ass-end of my celery and chopped it up too.  By the way... You know those green and yellow leaves that you toss whenever you chop celery? Shame on you! ;)  I always use mine in broths, soups, and stews for extra flavor. You should try it!

Last (but certainly not least), I gutted the nasty parts out of a sweet potato before coarsely chopping it and adding it to the mix.

Once the veggies were put into the crockpot with my carcass, I added some liquid.  Add whatever makes you happy -- chicken or veggie broth that you already have, water, booze, anything.  I had frozen a couple of cups of "onion broth" which came from my day-long onion simmering session a few weeks back... It will make a tasty addition for sure!  Tonight, I will soak my dry Lima beans and tomorrow we'll have a yummy, healthy, homemade dinner.

That's all for now. Happy broth-making! :)


Monday, August 26, 2013

Let's Make a Face-Washing Mitt!

I usually just splash cold water on my face and wipe with a napkin or something. (I do exfoliate in the shower, though.) Lately, I'm feeling the need to mix up my face care repertoire!

Today, I made this cleansing mitt out of a baby wash cloth and a length of ribbon.


It would have been better if I had 2 wash cloths, but I used what I had. This is designed to fit over the hand in order to get an easy, gentle cleanse.


This is all you need! If you're hand-sewing like I did, you'll require a needle and thread. My washcloth was a tiny bit bigger than my hand; I wound up using about a foot and a half (give or take) of ribbon.


And what adorable ribbon it is! This neon yellow poly ribbon came from Michael's, Gotta love those Halloween scores that work all year 'round! :)


After I eyeballed my ribbon and snipped the ends (always on the bias to help defray fraying!), I folded my washcloth into a triangular hand approximation and aligned my ribbon along the seam. This mitt-length ribbon helps to strengthen the seam, but its real purpose is so that I can hang the mitt to dry when I'm finished.


Overcast stitches along the edge will do nicely.  They needn't win any beauty contests to be effective.  Just make sure that your washcloth edges both get poked with the needle, or else you're gonna have holes!

This took me less than 15 minutes, and was super fun to make! I love easy & functional crafties. Any ideas what to make next? Post 'em here! :)


Saturday, August 10, 2013

Review: So Delicious Chocolate Ice Cream


Lately, it seems that all I'm doing is posting reviews about beauty products and food. I'm ok with that. :)

This summer, I have been living with a vegan that has made cooking a real challenge!  However, I've been rising to the occasion with fake meat recipes, fake egg recipes, and plenty of other fairly tasty inventions.  However, when I come across something that I don't have to pull together to enjoy, it makes me that much happier.

Enter "So Delicious" products... There's a vast array of ice creams, yogurts, and milks that would make your head spin!  I have tried their coconut milk-type-product and it was just okay, though a swig here and there isn't the same as *using* it somewhere.  But the ice cream has been a wonderful experience!  Lower in carbs and fat than traditional ice cream, it's a health-conscious dessert-o-phile's dream come true.  Only 150 cals for a 1/2 cup serving, and a scant 20 carbs (with just 12 from sugars)!  The consistency is very ice-cream-like, and the deep chocolate flavor is incredibly satisfying.  One drawback is that it doesn't scoop as smoothly as regular ice cream; but that's ok. Just let it melt for a few seconds.  

I love this stuff.  The one drawback is the price, at about $4 a pint!  However, since we are eating far leas takeout and processed foods these days, the cost difference isn't so bad. As my vegan says of a product that he enjoys, "It's humanizing."  When we can find things that make our lives easier & more normal, why not go for it every now and again? 


Sunday, July 28, 2013

How to Caramelize Onions in the Crockpot


One of life's biggest pains in the ass is chopping, sweating, and browning onions. The flavor really adds an important element to virtually anything that requires onions. So, we chop and hope for an easier alternative.

I had done some research and found that it is possible to cook, brown, and caramelize onions in the crockpot. When I tried it, the results were excellent! In fact, spending one day babysitting my onions yielded many days worth of tasty, awesome, flavorful brown onions.

Here's all you need: a 5-pound bag of plain old yellow or white onions, a couple of tablespoons of olive oil, and your trusty crockpot. 

Simply peel and chop all of your onions in the desired shape. (Rings for French onion soup, big blobs for stews, or minced if you like an all-purpose easy onion shape.). Put them all into your crockpot and drizzle your olive oil onto the onions. You don't need much! I typically use somewhere between 1 and 2 tablespoons.


Stir them up to coat with the oil, cover, and put your crockpot on "high" for a good long time (about 10 to 12 hours). Halfway through, you can stir them up a little.  Once the onions are done, I cool them overnight before portioning and freezing them. The onions yield a lot of juice, which is great to substitute for water in any savory recipe. About half a cup of "onion sludge"  can be used in place of an onion in your favorite recipe. 


Yes, five pounds of onions take a long time to cook this way.  But at least you can go about your day without having to keep your eyes glued to a skillet!  By the way... Your house will smell murderously delicious and savory while these are cooking away! Be sure to have a good dinner plan to distract you from the seductive aroma!


Saturday, July 27, 2013

This week's Graze Box (7/25)


Had some tasty things this week, as well as some drama!

Natural Vanilla Seeds. These were tasty as heck, sunflower and pumpkin seeds with a sweet vanilla glaze. BUT there was a big nasty crack in the container bottom! I ate them anyway, and shared them with my vegan guy.  This is one of my favorite types of snacks because the pieces are tiny and it takes awhile to eat. At 172 calories and only 13g carbs with a nice 4.93g protein, this is one of the better nutritional "values" Graze has to offer. Grade: A+

Tomato Dipinetti. This pummet had a saucy tomato dip with rosemary bread dippers. I was mad at this one!! All the rosemary breads were broken but ONE! The tomato "relish" dip was savory and spicy, and the (sad, broken, pathetic) dippers were still tasty aside from their shameful appearance. 97 cals and 16g carbs make this well worth the drama. Grade: B+

Scrumptious Blueberry Swirl.  This snack boasts a whole serving of fruit. Nice, even though I'm not a massive fan of dried fruit. There were those tasty black currants with blueberry yogurt raisins, and raspberry-flavored cranberries. 157 calories makes this a nice snack, but not if you're watching your carbs! For 30g of carbs, you might be better off saving the carbs -- maybe grab an apple and a cheese stick instead! Grade: C+

Eleanor's Apple Crumble.  This is a better fruit snack choice for carb-watching Grazers, at a friendly 19.9g of carbs.  114 cals is just right, plus you get a nice hit of protein (2g) from the decadent honey-cinnamon almonds. The raisins are a little boring, but I liked the chewy apples so much that I just may investigate drying my own. This is a keeper! Grade: A


This week's Graze box! (7/17)

Hi all! Got some goodies from Graze this week...

First up: My Thai, soy crisps with sweet chili dipping sauce. Holy shit! These were delicious!! At 84 calories and a scant 18 carbs, this pummet hit all my favorite taste points of sweet, hot, salty, and savory. Most people know I am a big fan of sweet chili sauce, so this was divine! Grade: A+

Orange & Ginger Flapjack. I'm just not a flapjack fan, sorry. However, the piece I sampled was very orangey and gingery. So if I was more into flapjacks, this is the one I'd choose. I gave the rest of the pummet to the vegan guy next to me, and he said they were so good he'd wished he could buy them directly from Graze. Also 241 calories is as much as a Lean Cuisine meal, so have to take points off for that. Grade: B-

Summer Pudding. Black currants, cranberries, yogurt sunflower seeds, and spongey cookie bits make a delightful combo.  The spongey bits are rather superfluous IMHO, but damn those sour currants are deeeeeelicious!  137 calories isn't bad for a nice little snack, but I can't always justify 27 carbs no matter how delightfully sour those black currants are! Maybe good for a "sometimes" treat.  Grade: B

Salt & Vinegar Nut Selection.  Oh man, these were yummy. I could have used more vinegary flavor on the mix of almonds and peanuts.  I don't eat peanuts too often, but if I did, this is just how I'd do it.  We've got a scant 8 grams of carbs here, and even though the sodium is a bit high (269), there's also 8g protein in this yummy 200-calorie powerhouse.  Grade: B+


Related Posts Plugin for WordPress, Blogger...